Genesys Set-Up Guide
Introduction
NPS for Genesys offers an automatic and flexible survey set-up that enables you to view insightful feedback data in Genesys. Our Genesys plug-in is an extension of your existing nps.today account and customer loyalty program.
What is Installed
Data Actions
- Send Survey: Set up survey triggers in your workflow.
- Check if Throttled: Check if a respondent is throttled in nps.today.
- Check if Unsubscribed: Check if a respondent is unsubscribed in nps.today.
- Manager Details from Conversation: Get Genesys manager information for survey triggers.
- Fetch Queue ID from conversation: Get queue ID from conversation which is needed in the Send survey data action.
Widgets
- Feedback App Interaction Widget: View historical response data on incoming calls and ended conversations.
- Feedback App Widget: Enables historical response data related to the agent logged in.
Prerequisites
- Active nps.today subscription
- IVR enabled in nps.today
- Feedback App enabled in nps.today
- Active Genesys subscription
- Administrator access in Genesys
Required permissions: “All Process Automation” & "All Architect" - Administrator access in nps.today
Install the plug-in
When you are granted access to NPS for Genesys through AppFoundry you can run the installation wizard on your Genesys account.
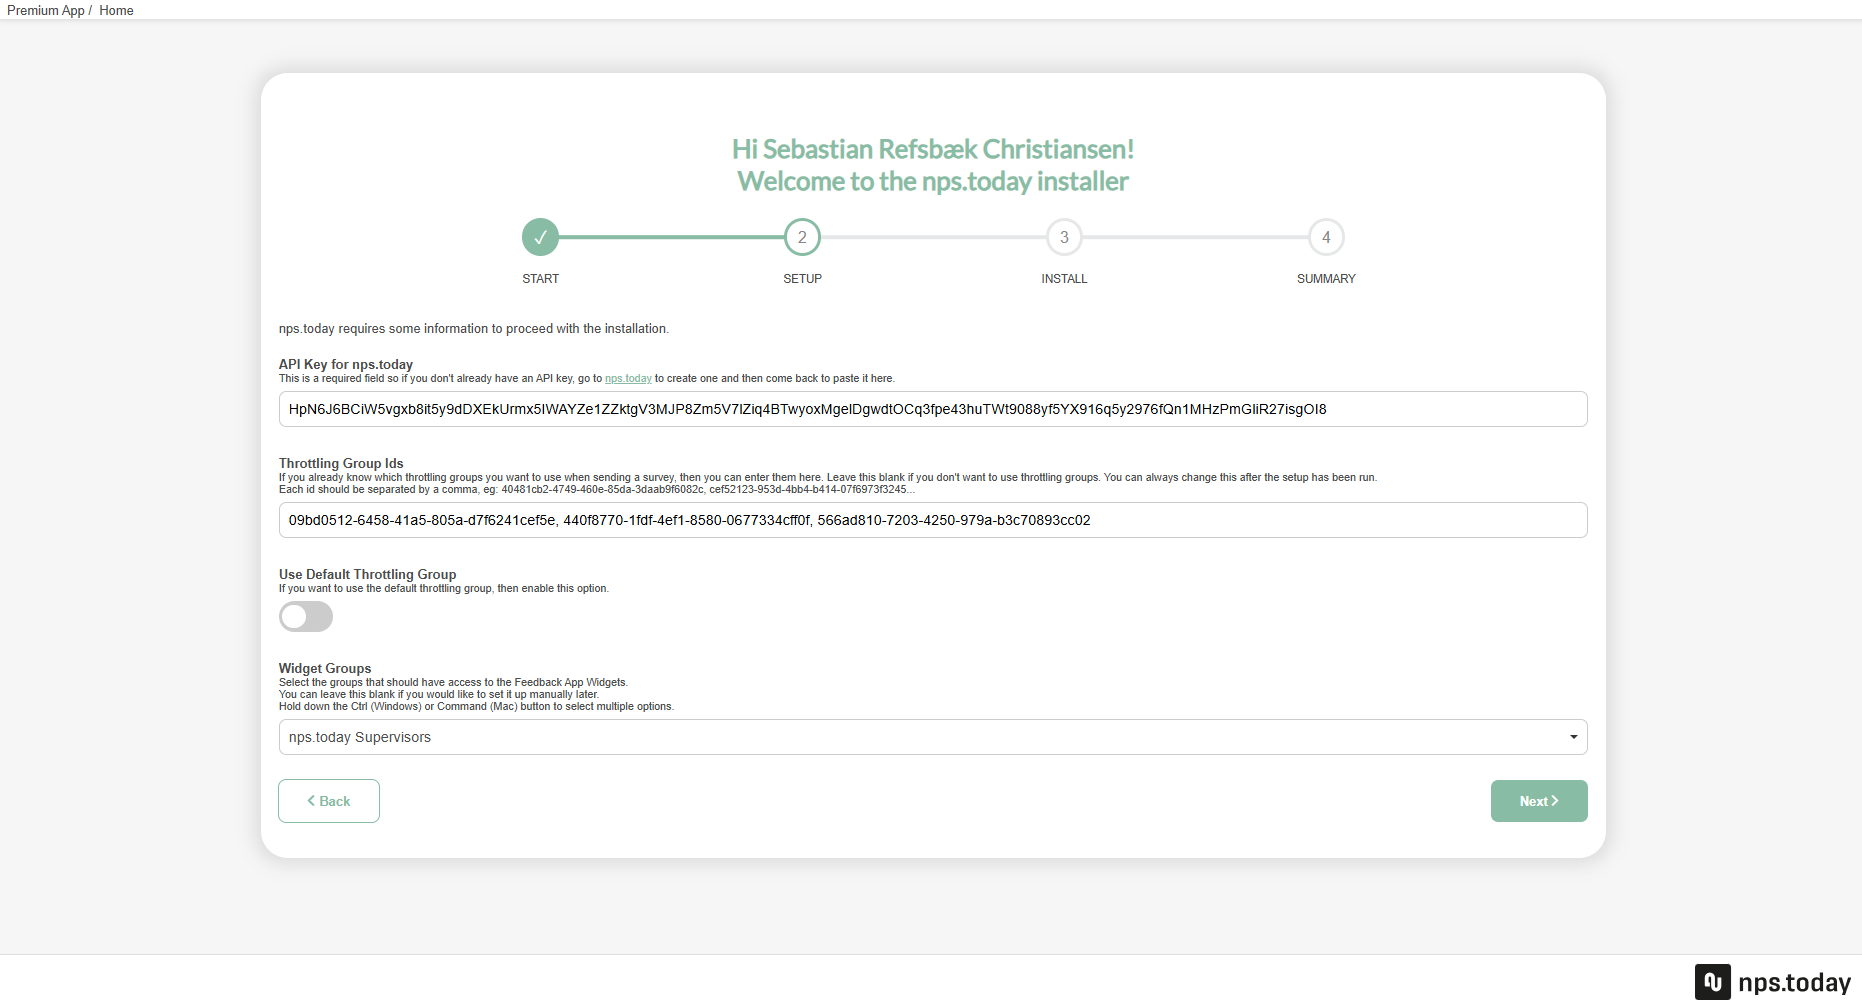
When you are on the SETUP page you need to fill in some information. Only the API key is required to continue. All the other fields can be configured after the installation.
API Key for nps.today: Put in an API key from nps.today.
Change API Key
To change your api key at a later stage go to Architect -> Integrations -> nps.today Data Actions -> Configuration -> Credentials -> Click "Change" - > Click "Add Credential Field".
- Field Name: ApiKey
- Value: Put in an API key from nps.today.
Click "OK".

Throttling Group Ids: Id of throttling groups used for checking for throttling. Review this section on how this is set up.
Use Default Throttling Group: Enable or disable default throttling group. Review this section on how this is set up.
Widget Groups: Choose User groups which should have permission to view the Feedback App Interaction Widget and Feedback App Widget. Read more about how these permissions are set up by following the links below.
Feedback App Interaction Widget
You can now continue the installation and complete it.
Set up IVR in nps.today
To enable data to flow from Genesys to nps.today you need to set up an IVR connection in nps.today. When setting up an IVR for Genesys you are mapping a specific queue in Genesys to a campaign in nps.today. You can set up several IVRs to control how data flows between Genesys queues and nps.today campaigns.
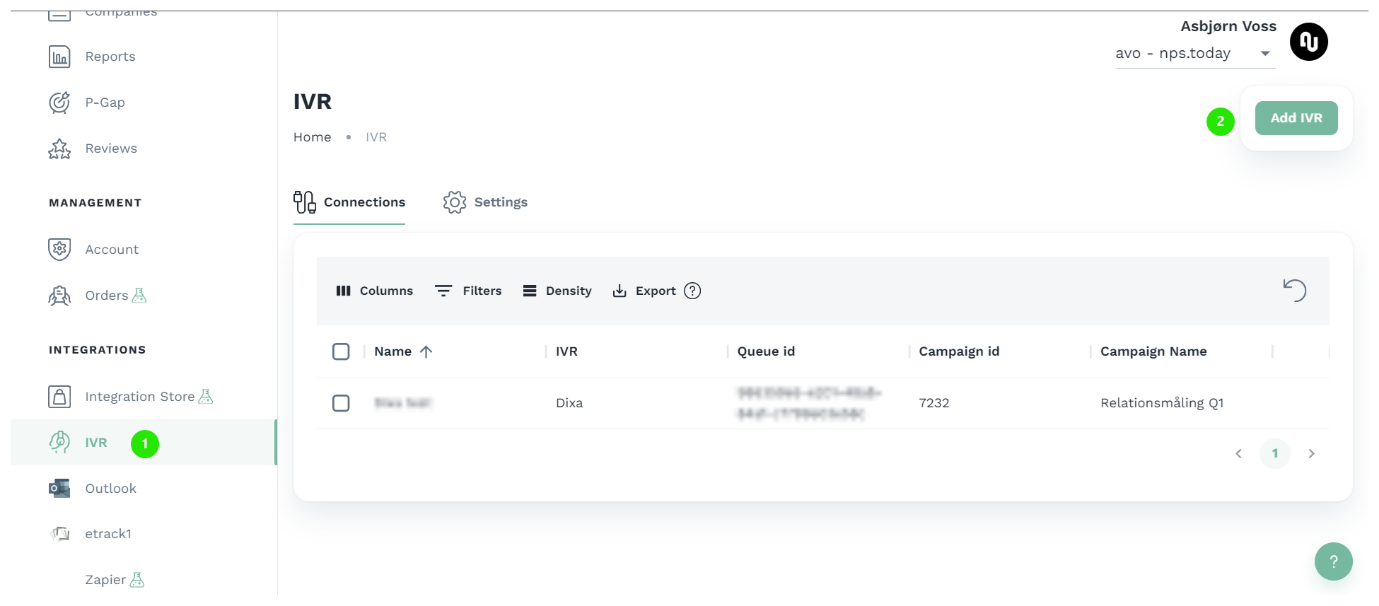
Log in to your nps.today account with an Admin user.
Go to IVR and click "Add IVR".
If IVR is not visible on our account please contact nps.today Support.
Now put in the following information in the IVR set-up:
Name: Name for your integration.
IVR Provider: Choose "Genesys".
Campaign: Select the campaign that should receive data from Genesys.
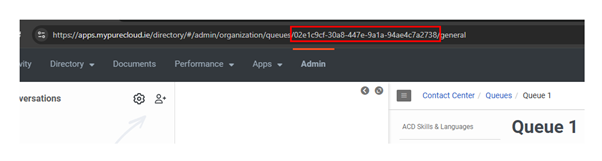
Queue Id: Put in a queue ID from Genesys. This ID is found in Admin -> Queues -> selecting the queue and copying the queue ID from the URL in your browser.
The client ID for the Genesys Cloud API: To find this value go to Admin -> OAuth -> Select nps.today Data Action Client -> copy the client ID.

The client secret for the Genesys Cloud API: To find this value go to Admin -> OAuth -> Select nps.today Data Action Client -> copy the client Secret.

Agent interact time: Here you can decide how long the interaction time between the latest agent in a conversation and the caller should be to send out a survey.
Genesys Cloud Region: Select the region your Genesys account is located in.
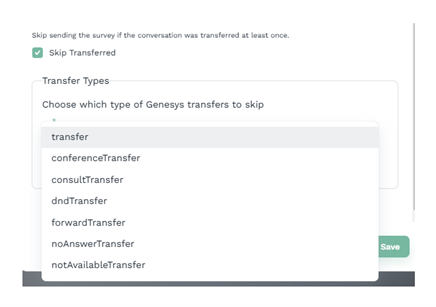
Skip Transfer: This let you skip sending the survey if the conversation was transferred at least once. You can select which type of transfer(s) that should skip a survey in the drop-down.
Now click save.
When your IVR is set up you have mapped a connection between a queue in Genesys and a campaign in nps.today.
IVR set up is required
Remember to setup a IVR for every queue sending respondents from Genesys to nps.today. This is required as an addition to setting up the Send Survey data action in your Genesys workflow.
Data actions
When installing our plug-in on Genesys AppFoundry you will have access to data actions which enable you to set up your survey program in Genesys. This section will guide you through the functionalities and how to set it up.
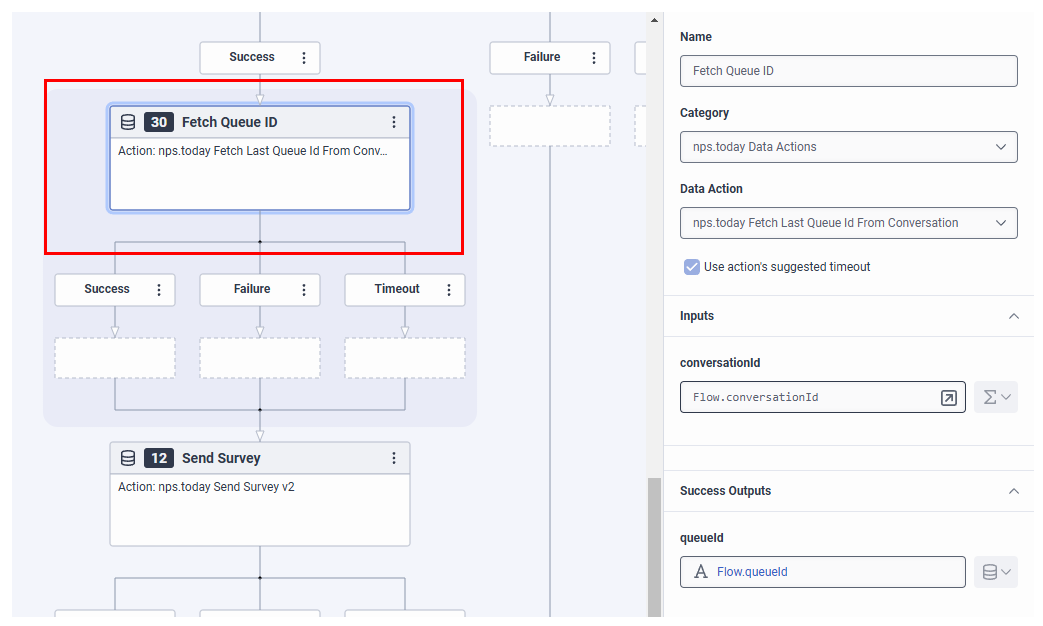
Fetch Queue ID
To send a survey with our "Send survey" data action we need to fetch the Queue ID from the conversation.
Create a “Call Data Action” in your workflow before the Send Survey data Action.
Category: Select your nps.today Data Actions.
Data Action: Select the "nps.today Fetch Last Queue Id From Conversation" data action.
Get conversationId: create a data variable called conversationid as a string and use this by adding an expression Flow.conversationId.
queueid: create a data variable called queueId as a string and use this by adding an expression Flow.queueId.
Send Survey
Trigger surveys on multiple media types
The use case in this section is of the media type Call. Note that you can trigger surveys on all media types with our Send Survey data action. This includes Call, Callback, Chat, Email, and Message.
You can see all media types in the schema on this Genesys documentation site.
No survey on abandoned calls
If the caller leaves the call without talking to an agent the survey will be skipped.
An example of this is if the caller enters a queue but hangs up before the agent answers the call. In this case the survey will be skipped.
Trigger a survey with workflow
To trigger a survey in a workflow, start by creating your necessary data variable needed later.
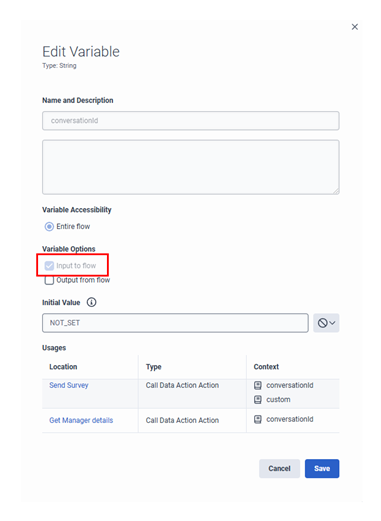
Get conversationId: if not done yet, create a data variable called conversationid as a string.
Get phone number: create a data variable called ani as a string.
Queue ID: We also need the Queue ID from the conversation using the nps.today data action "nps.today Fetch Last Queue Id From Conversation" described here.
Both variables need to have the Input to flow enabled, see example below:
Now create a “Call Data Action” in your workflow where you want the survey to be triggered.
Category: Select your nps.today Data Actions.
Data Action: Select the nps.today Send Survey data action.
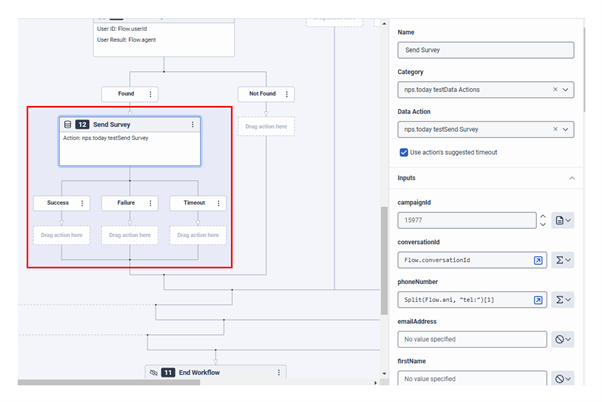
Now fill out the Input fields: campiagnId, conversationId, and either email or phoneNumber is required to trigger a survey.
In this example we use the phone number field as we want to trigger an SMS survey.
queueId: This value is fetched via our "nps.today Fetch Last Queue Id From Conversation" data action. See how to use the data action here.
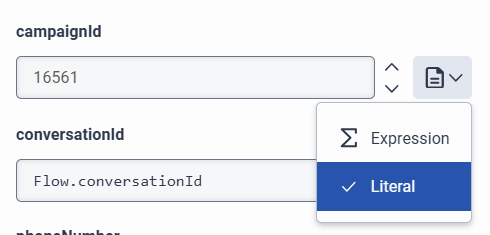
campaignId: The campaign ID in nps.today you want to add the respondent to. See here where to find the campaign ID. Make sure to leave the type as "Literal" to ensure the data action functions properly.
Campaign ID not required
A campaign ID is only necessary if you are mapping the same Queue to several campaigns in nps.today in the IVR set-up in nps.today. A campaign ID is only necessary if you are mapping the same Queue to several campaigns in nps.today in the IVR set-up in nps.today.
conversationId: Use the data variable we created earlier by putting in an expression Flow.conversationId.
phoneNumber: Set the phoneNumber field as an expression and put in the following expression to remove “tel:” from the phone number data:
Split(Flow.ani, "tel:")[1]
See setup example below:
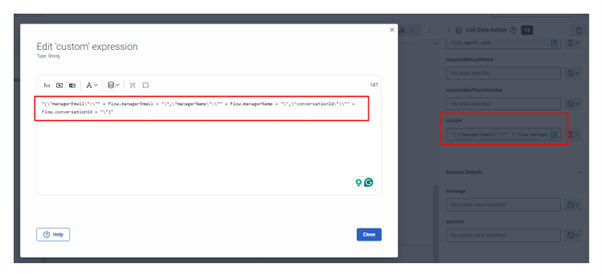
If you like to add specific data to the respondent, you can use the custom Input field. Here you can add as much data as you like.
Add the data as an expression in JSON format.
Se blow example where managerName, managerEmail, and conversationId is added in the custom Input field:
"{\"managerEmail\":\"" + Flow.managerEmail + "\",
\"managerName\":\"" + Flow.managerName + "\",
\"conversationId\":\"" + Flow.conversationId + "\"}"
Setup a trigger
workflow required
To set up a trigger you need to first have a workflow enabled as it needs to target a specific workflow in your trigger.
On triggers for sending out surveys you need to first create a trigger.
- Go to Triggers in Admin and add a new trigger.
- Give it a name and a description.
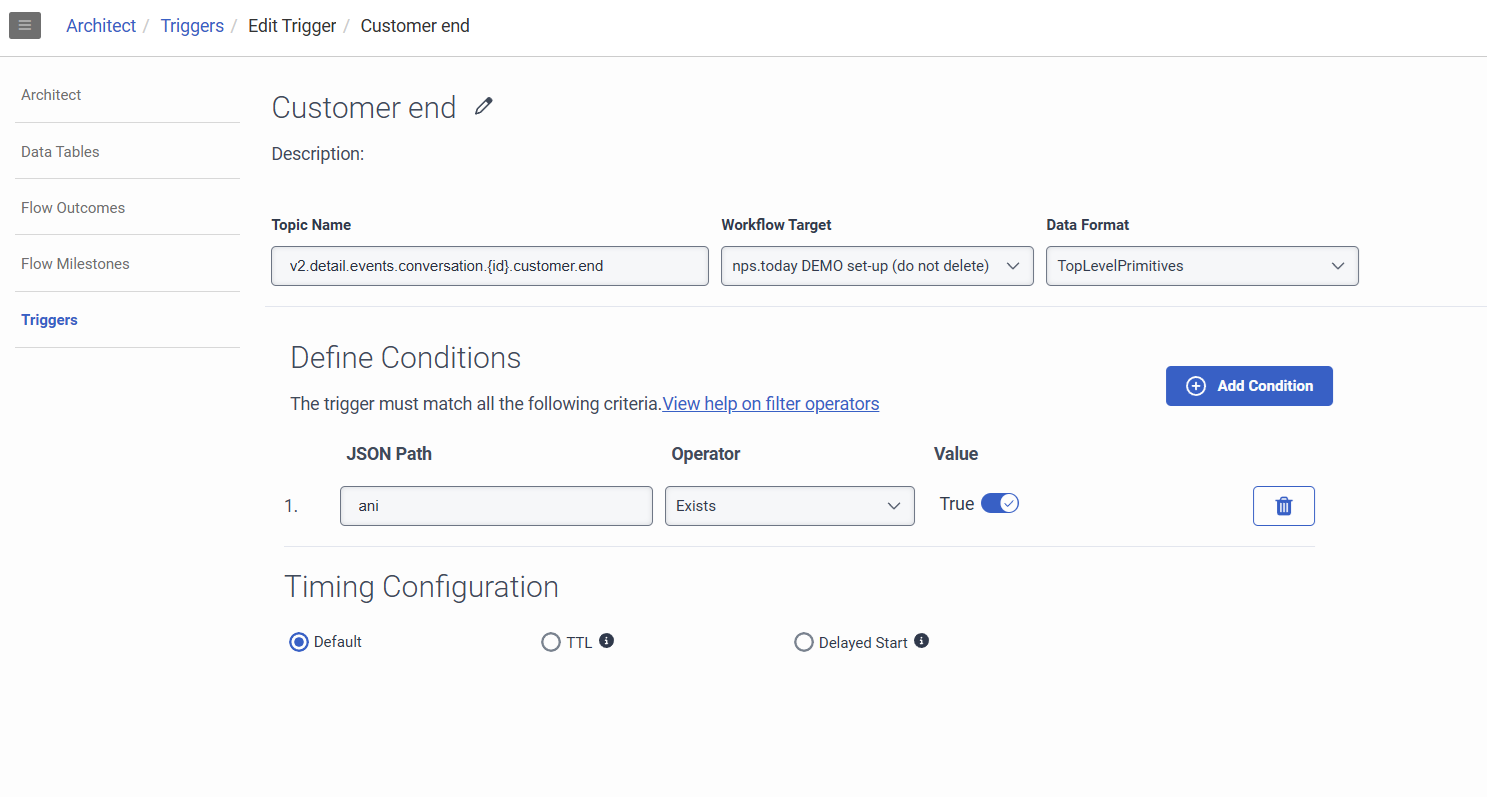
- Topic Name: As Topic Name select
...conversation.{id}.customer.endas all relevant data on the caller is available here. - Workflow: Select the Workflow target to use the trigger
- Data format: Select
TopLevelPrimitivesas Data format - Define conditions: Avoid unnessecary trigger events by defining a condition on json path "ani" with an operator that checks if it exists. This will prevent the flow from running when a phone number is not available
Below you see an example of the trigger.
Add agent as the responsible to the survey
It is often relevant to add the agent as a responsible to the survey for later data analysis.
The last agent who interacted with the caller will automatically be set as the responsible employee. This is done by nps.today when the survey is sent. If you want to override the default behaviour, the “responsibleFirstName”,“responsibleLastName”, “responsibleEmail” and “responsiblePhoneNumber” fields can be filled in manually.
Check for throttling
This data action checks if the respondent is throttled in nps.today.
A use case for this could be, that you want to play an IVR asking the caller if they would like to receive a survey after the call. If they are throttled in nps.today the IVR should not be played, as the caller will not receive a survey.
Set-up
Go to Admin -> Integrations -> find “nps.today Data Actions”.
Now go to configurations -> Advanced.
In the Advanced Configuration you can choose what throttling groups in nps.today the data actions must check to see if the respondent is in a throttling period. If several groups are selected the campaign with the longest throttling time within the selected groups will get picked.
Throttling example
If you have two throttling group IDs selected in your data action, with two campaigns in each group the data action will look at all 4 campaigns and check for throttling on the campaign with the longest throttling period set in nps.today.
In below example the respondent will not receive a survey if the respondent has received a survey within 4 days (see campaign 4)
Throttling group A
Campaign 1: Throttling period = 1 day
Campaign 2: Throttling period = 2 days
Throttling group B
Campaign 3: Throttling period = 3 days
Campaign 4: Throttling period = 4 days (selected)
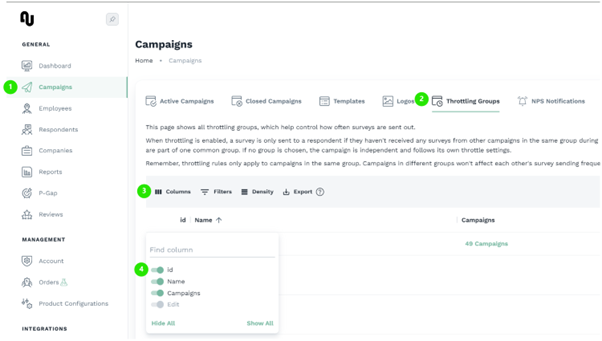
The groups are selected by adding the Throttling Group ID found in nps.today. This is found by adding the ID column in the Throttling Group overview.
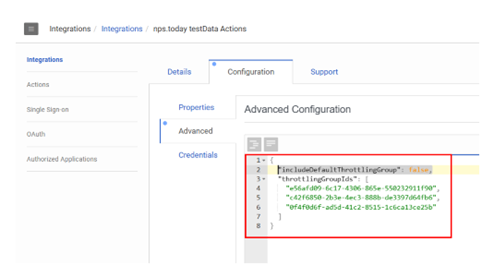
includeDefaultThrottlingGroup is a Boolean:
If true = campaigns in the Default throttling group will be included in the check
If false = campaigns in the Default throttling group will NOT be included in the check
You need to add them in a JSON format as you see in below screenshot.
Get JSON format here
{
"includeDefaultThrottlingGroup": false,
"throttlingGroupIds": [
    "e56afd09-6c17-4306-865e-550232911f90",
    "e78f60e8-8ac1-4269-8ea6-57aa90999097",
    "d016c57c-bb73-4d8f-9ae6-2a74178bf020"
    ]
}
Add to workflow
With the above set up, you are ready to add the ‘Check if throttled’ data action to your workflow.
Add the action
Start by adding a Boolean data variable in your workflow. Give it a name of your choice. We call it isThrottled.
Now add a "Call data action" in your workflow -> select the nps.today data action in Category -> select the data action ‘Check if throttled’.
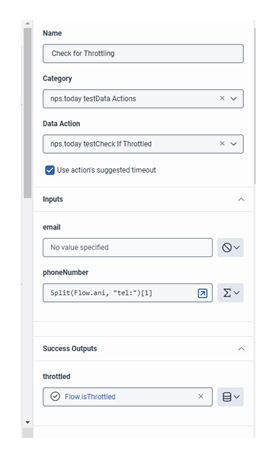
Input
In the Input fields you can write an email or phone number as an unique identifier, which is used to check if the respondent is throttled. In this case we use a phone number as this workflow is for a phone call.
To get the phone number you need to create a String data variable, if this is not set-up in the survey trigger section. Call the variable ani and remember to enable “Input to flow”.
Set the phoneNumber field as an expression and put in the following expression to remove “tel:” from the data:
Split(Flow.ani, "tel:")[1]
Success Outputs
In success Outputs add the data variable isThrottled created earlier by using an expression like this: Flow.isThrottled.
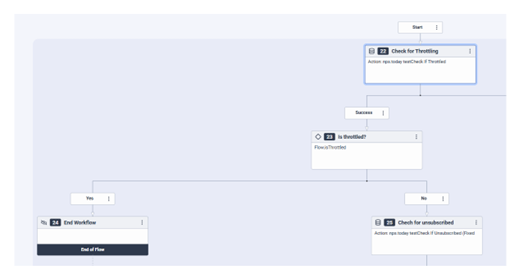
In your “Check if throttled” action under “Success” you should now add a ‘Decision’. The Decision is used for the Flow.isThrottled variable to determine what to do next.
In this example if the ‘Check if throttled’ action returns true the respondent is in a throttling period and the decision will go to “Yes”.
If “No” we can continue, as the respondent is not throttled.
Below is an example of how this set-up could look:
Check for unsubscribe
This data actions checks if the respondent is unsubscribed in nps.today.
A use case for this could be, that you want to play an IVR asking the caller if they would like to receive a survey after the call. If the caller is unsubscribed in nps.today the IVR should not be played, as the caller will not receive a survey.
Add to workflow
Add the action
Start by adding a Boolean data variable in your workflow. Give it a name of your choice. We call it isUnsubscribed.
Now add a ‘Call data action’ in your workflow -> select the nps.today data action in Category -> select the data action ‘Check if unsubscribed’.
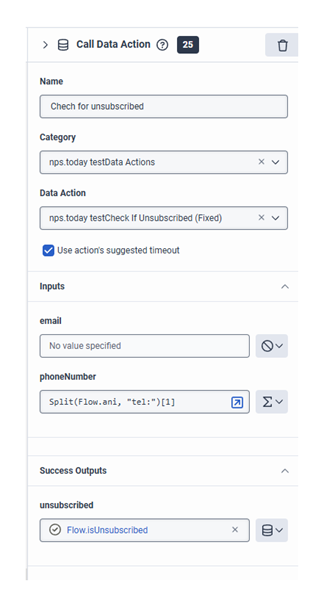
Input
In the Input fields you can write an email or phone number which is used as an unique identifier to check if the respondent is unsubscribed. In this case we use a phone number as this workflow is for a phone call.
To get the phone number you need to create a String data variable, if this is not set-up in the survey trigger section. Call the variable ani and remember to enable “Input to flow”.
Set the phoneNumber field as an expression and put in the following expression to remove “tel:” from the data:
Split(Flow.ani, "tel:")[1]
Success Outputs
In success Outputs add the data variable ‘isUnsubscribed’ created earlier by using an expression like this: Flow.isUnsubscribed.
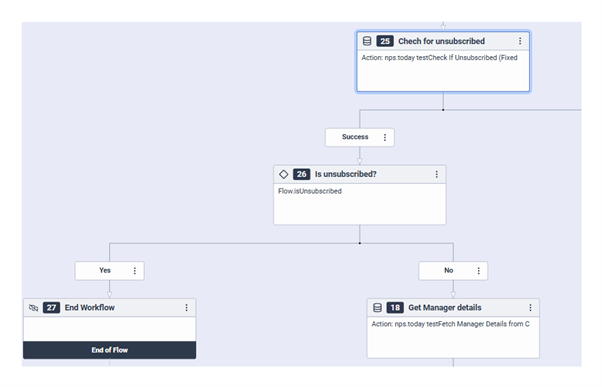
In your ‘Check if unsubscribe’ action under “Success” you should now add a ‘Decision’. The Decision is used for the Flow.isUnsubscribed variable to determine what to do next.
In this example if the ‘Check if unsubscribe’ action returns ‘true’ the respondent is unsubscribed in nps.today and the decision will go to “Yes”.
If “No” we can continue, as the respondent is not unsubscribed.
Below is an example of how this set-up could look:
Get manager information
With the data action “Fetch Manager Details from Conversation” you can get data on the manager of the agent responsible for the conversation. This data is often used to trigger instant NPS Notifications on email to the manager.
Data variable
Start by creating two String data variables, which is needed to collect the Manager email and name.
mangerEmail to collect the manager email.
managerName to collect the manager name.
Add the action
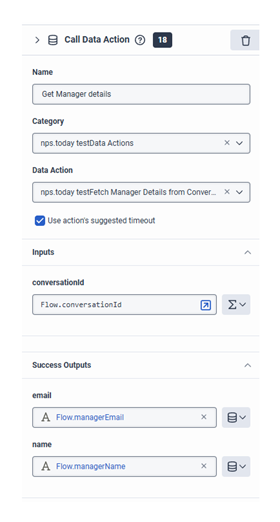
Now add a ‘Call data action’ in your workflow -> select the nps.today data action in Category -> select the data action “Fetch Manager Details from Conversation”.
Inputs
In the ‘conversationId’ field put in the expression Flow.conversationId using the conversationId data variable create earlier in the Send Survey section.
Success Outputs
Put in the data variables.
email = Flow.managerEmail
name = Flow.mangerName
If no manager is found
If no manager is found for the agent, the email and name success outputs will be empty text.
Now the data is available to use in your Send Survey data action. The data can be placed in the custom field.
Review this section on how to add data to the custom field in the Send Survey data action.
Widgets
Agent access to Feedback App
With nps.today for Genesys you get two widgets which enables the agent to get valuable insight on the customers feedback. This is also what we refer to as the "Feedback App".
To grant access for your agents to view data in the widgets you need to set up the Feedback App in nps.today.
If the Feedback App configuration is not available under “Product Configurations” on your account please contact nps.today Support.

Review this guide for the agent to grant access to the Feedback App.
You can customize the Feedback App in nps.today to show the data that is needed for your particular use case.
Review this guide to set up the Feedback App.
Employee Widget
The Feedback App Widget enables historical response data related to the agent who is logged in.
Your agents will always be able to find the widget in the Apps panel, if the agent has the permission to view it.
Employee Widget example

Grant permission
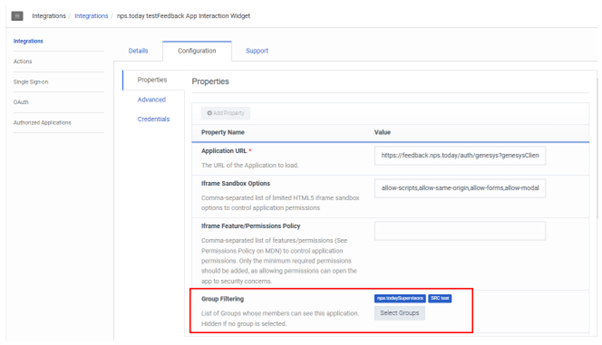
For the agents to grant access to see the Feedback App Widget go to Admin -> Integrations -> find the “nps.today Feedback App Widget”.
Under “Configuration” find “Group Filtering” where you can enable the widget for specific User Groups.
Save the configuration.
Interaction Widget
The Feedback App Interaction Widget enables the agent to view historical response data on incoming- and ended calls which have not been wrapped up. The agent can see all responses in nps.today related to the phone number or email on the caller.
The Interaction widget is available in the widget tab during a call, if the agent has permission to view it.
Interaction Widget example

Grant permission
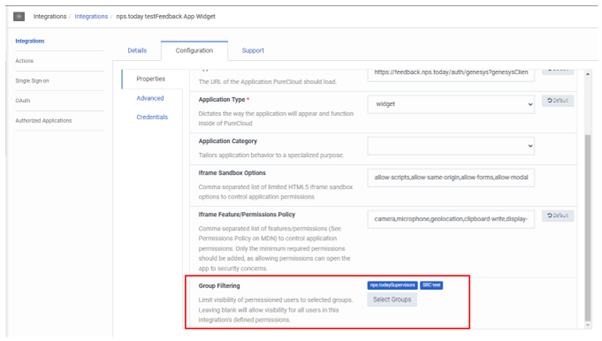
For the agents to grant access to see the Feedback App Widget go to Admin -> Integrations -> find the “nps.today Feedback App Interaction Widget”.
Under “Configuration” find “Group Filtering” where you can enable the widget for specific User Groups.
Save the configuration.
For complex configurations or additional guidance, please contact nps.today Support.