Salesforce Messaging
With our feature for Salesforce Messaging, you can prompt customers with surveys in a Salesforce messaging session. This feature will also enable you to view the survey answer on the related messaging session.
It is recommended to read through the whole guide before starting the set-up.
Showcase
Salesforce Messaging Showcase
Prerequisites
- Have an nps.today subscription
- Your nps.today subscription includes our Salesforce integration
- Have installed the nps.today for Salesforce Standard version
nps.today [email protected]or newer
View the installed version number under “Installed Packages” in Salesforce
Set-up in Salesforce
If you haven't done it already you need to setup your Salesforce Org to use Salesforce Messaging. To do that we recommend you to follow this Salesforce Messaging guide.
When your Org is ready to use Salesforce Messaging you can start preparing Salesforce Messaging to use nps.today surveys.
This chapter will highlight what you need to set-up to use surveys in Salesforce Messaging.
Install nps.today for Salesforce
Start by installing the Salesforce Messaging package found here.
Create a Survey page on your Site
You can set it up as you like to fit your current settings. This is an example of how you can do it.
-
Go to Setup -> Sites -> Create a new Site and fill out the relevant information.
-
Choose a page to select the
NPSMessagingSurveyVisual Force page. In this example we are using the "Active Site Home Page". -
Save your Site and click Preview

-
In the Preview copy the URL.
-
Save this URL somewhere and use it later to setup your Messaging Component in the chapter about Messaging Component.
Guest User Settings
Site Access Setting
-
To give the Guest User access to the Visual Force page in the Survey Component from a third party webpage please follow this Salesforce guide.
-
In "Enable Apex Class Access" grant Permission to
npstoday Helperandnpstoday NPSMessagingSurveyController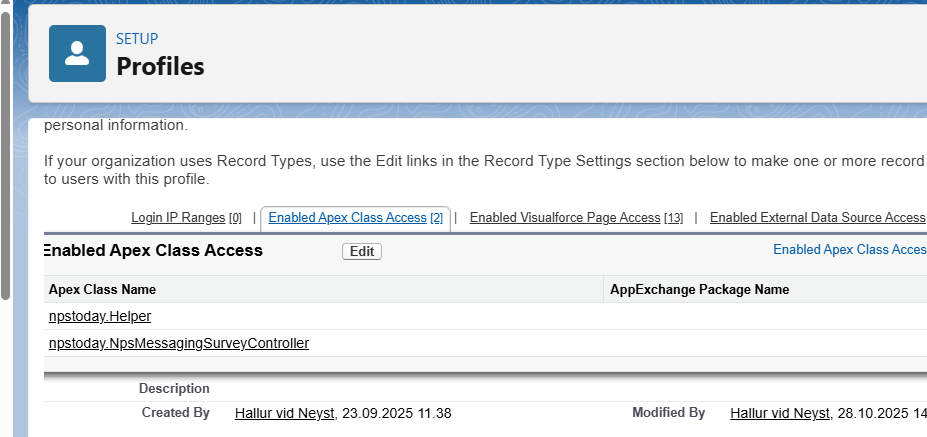
-
In "Enable Visualforce Page Access" add the
npstoday NPSMessagingSurveyController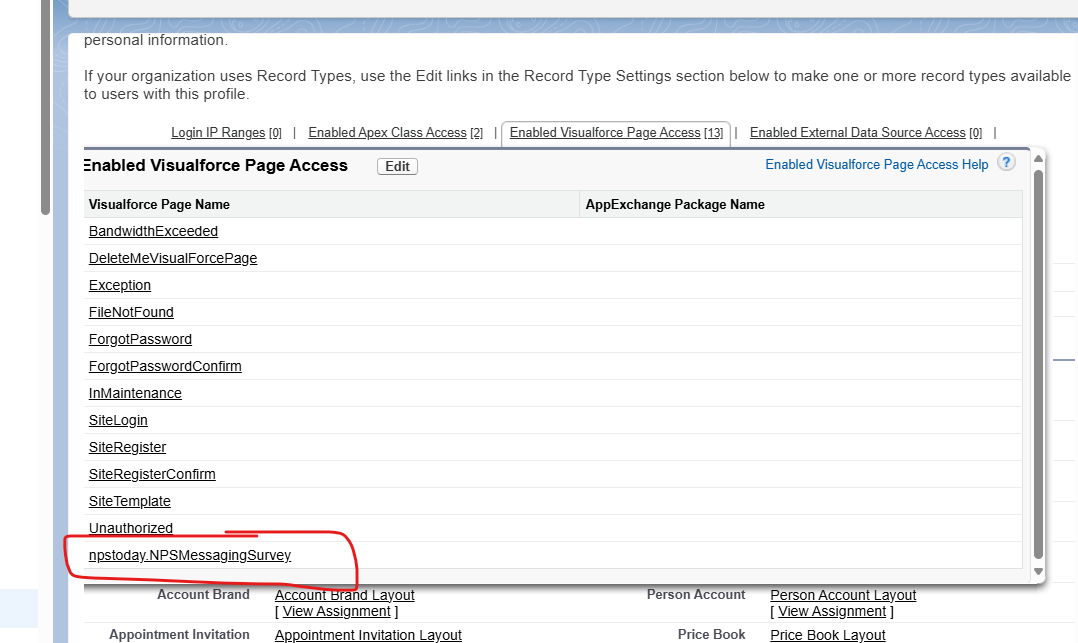
-
Edit profile and scroll down to "Custom Object Permissions" and check if the follow boxes are toggled.

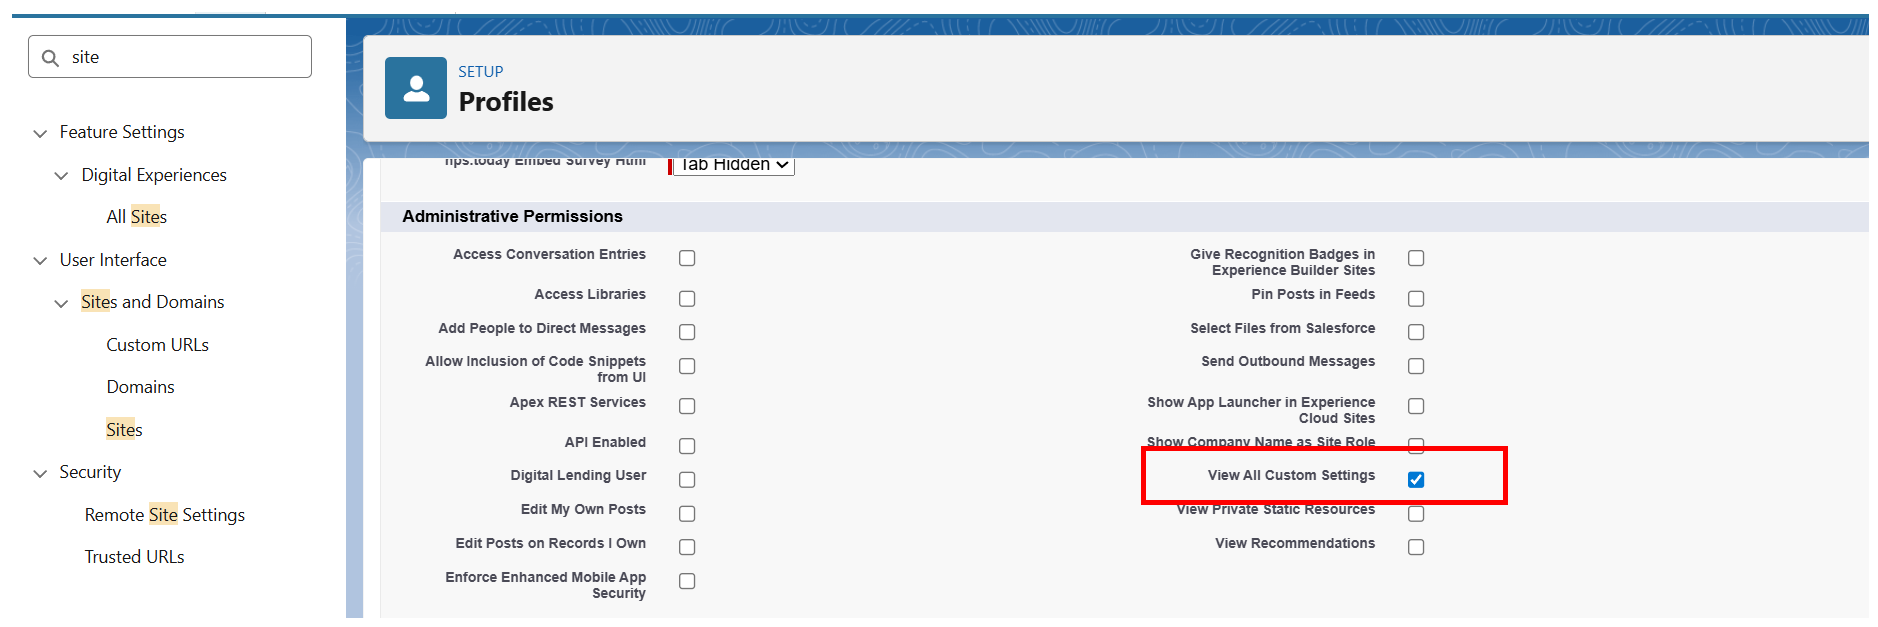
Enable "View All Custom Settings"
Enable "View All Custom Settings" by navigating to:
Sites -> open your site -> click "Public Access Settings" -> Edit -> go to the "Administrative Permissions" sections -> enable "View All Custom Settings"
Create a Messaging Component
In 'Service Setup' go to 'Messaging Components'.
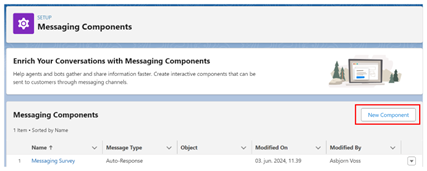
Create a Component of the type 'Auto-Response', and write the message you would like to be shown when the survey is prompted in text format. This text could be:
Please give your feedback on how you experienced our service.
When you have created the Component, open the Component and add a new component format of the type 'webpage'.
Go to “Details” and click 'Add format'.
This will enable you to display the survey directly in the messaging session without the customer having to click a link.
In the 'webpage Component Properties', found under 'Component Formats' you need to set it up as follows:
Message Configuration:
Type: Constant
Constant: $Constants.Title
URL Configuration:
Type: Literal
Text: {Survey link}?id={{Id}}
{SurveyLink}
You need to use the link from the earlier step Create a Survey page on your Site. The link from here is your {Survey link}.
You need to add ?id={{Id}} to the link.
The URL could look like this:
https://orgfarm-fe6c27d89f-dev-ed--npstoday.develop.vf.force.com/apex/NPSMessagingSurvey?id={{Id}}
Display Configuration:
Display Method: Popup Message
webpage Parameters:
Add a parameter
Parameter Name: Give it a name of your choice (this field is required to save the changes)
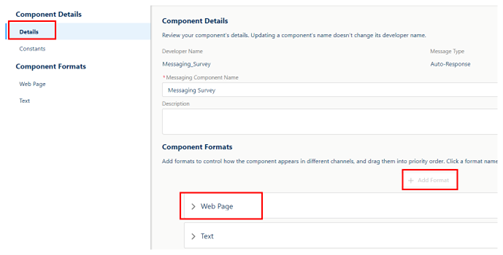
Type: Formula
Formula: In the 'Create formula' window pick the field Messaging Session ID and click 'Save & insert'
Now save your component.
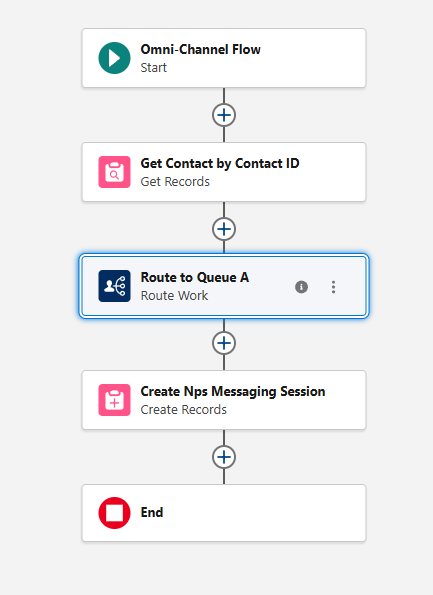
Create Omni-Channel flow
For connecting the customer to an agent in a queue you need to have a flow that enables this. If you are using Salesforce Messaging, you probably already have a flow setup for this.
You will need to create a NPS Messaging Session record. This is where you map data to the respondent. This chapter will create a simple flow to show what you need to add to your current flow.
Note that some of the settings set in the example can vary depending on your set-up and use case.
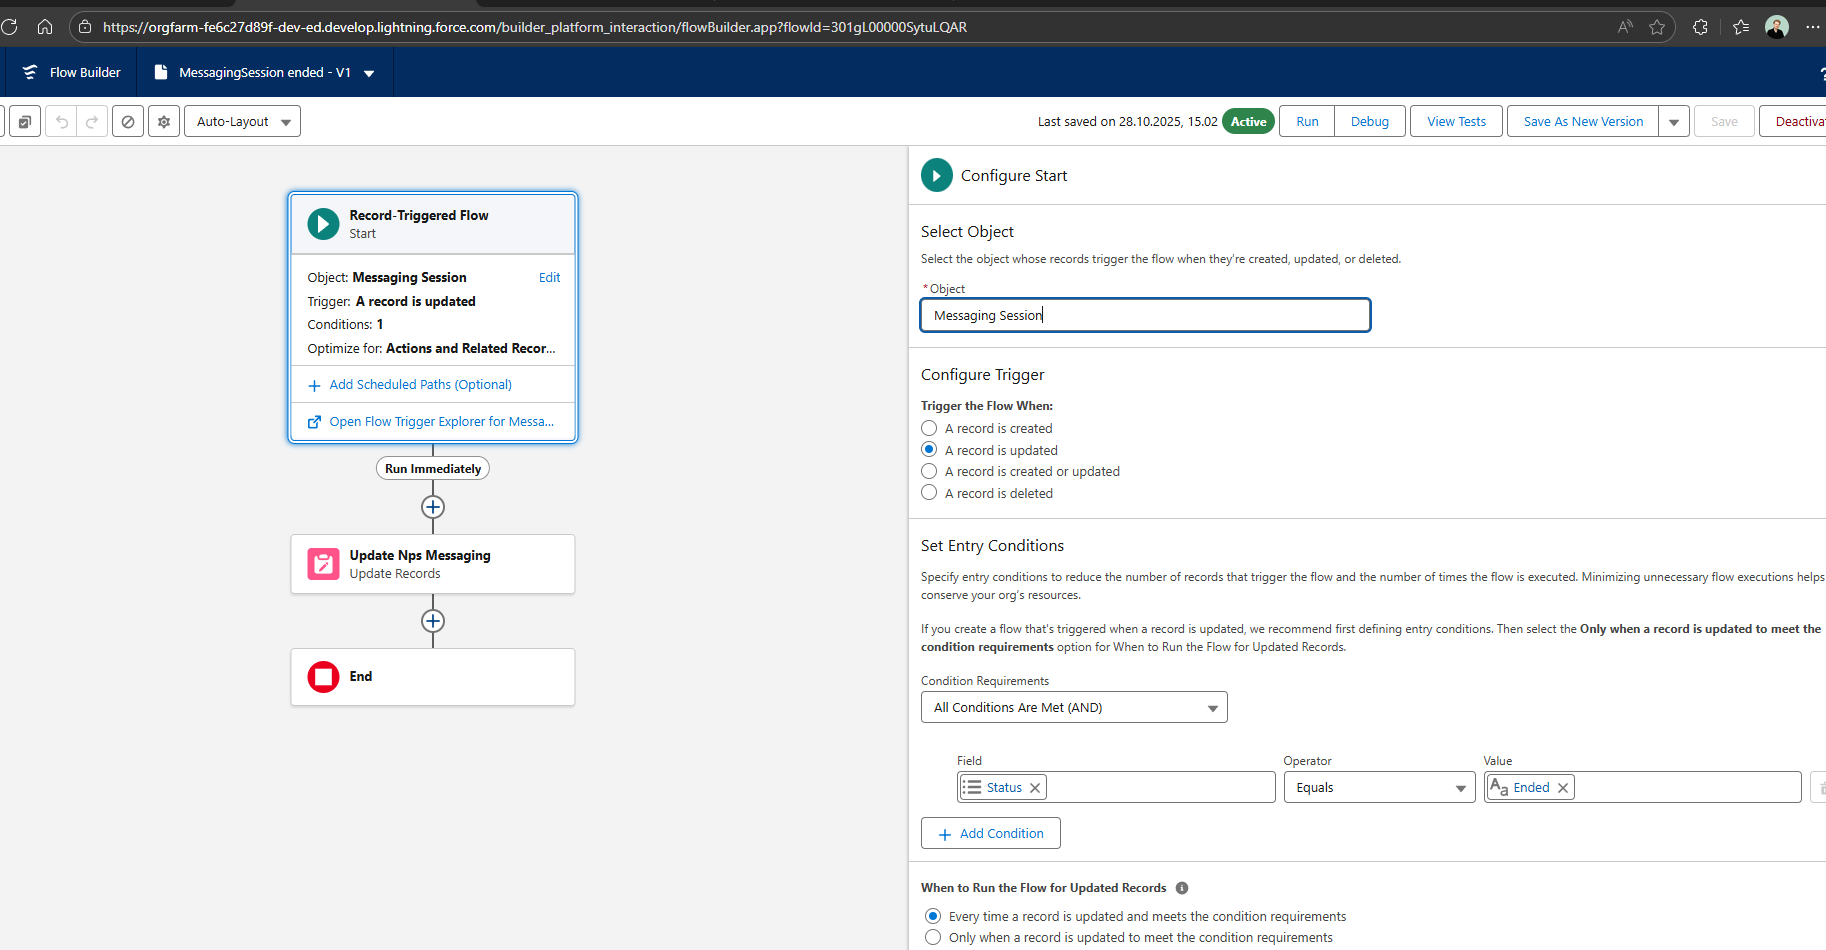
Create a NPS Messaging Session
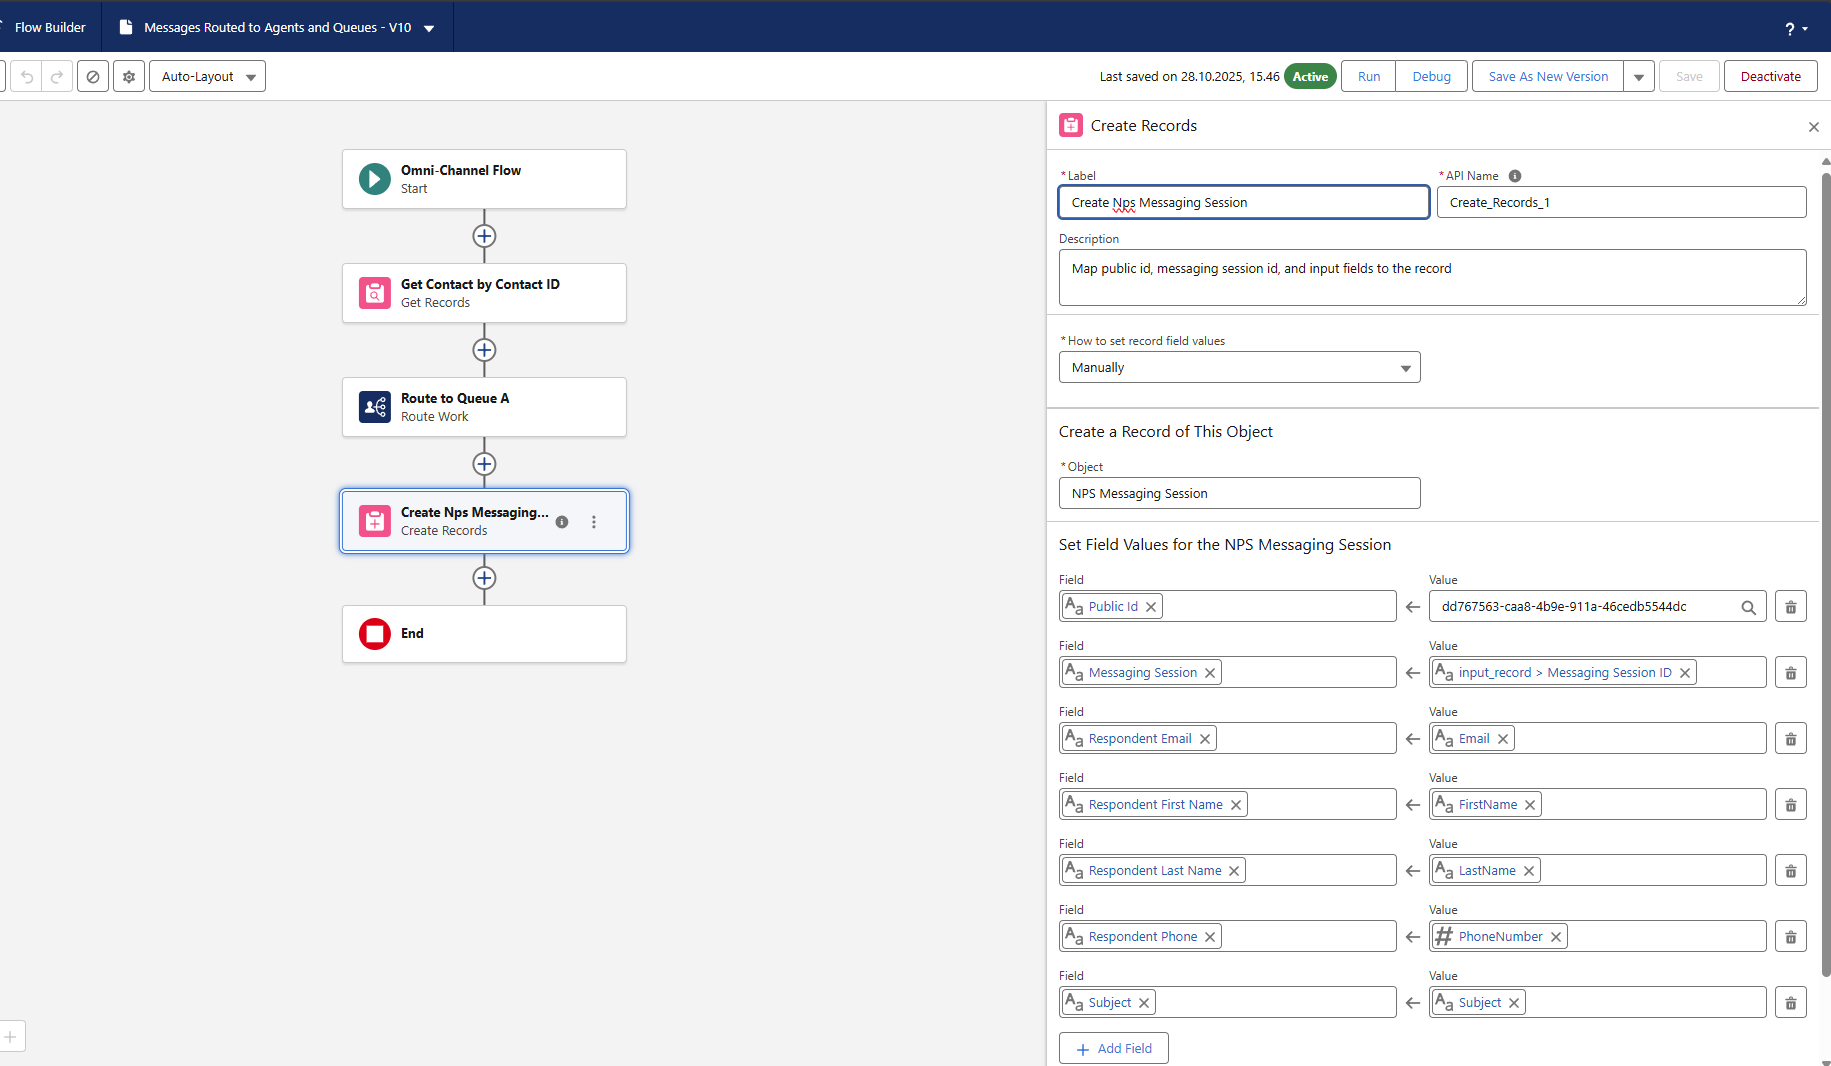
Public ID:
The nps.today Public ID is needed to add the respondent to a campaign in nps.today.
In the section "Set Field Value for the Messaging Session Records" you need to add the field npstoday__Public_Id__c with the Public ID from the campaign in nps.today you want to send data to and trigger survey.
See here on how to find the Public ID on a campaign in nps.today.
Messaging Session ID:
Add the Messaging Session ID to the respondent to later sync the feedback back the the relevant Messaging Session.
Other data mapped:
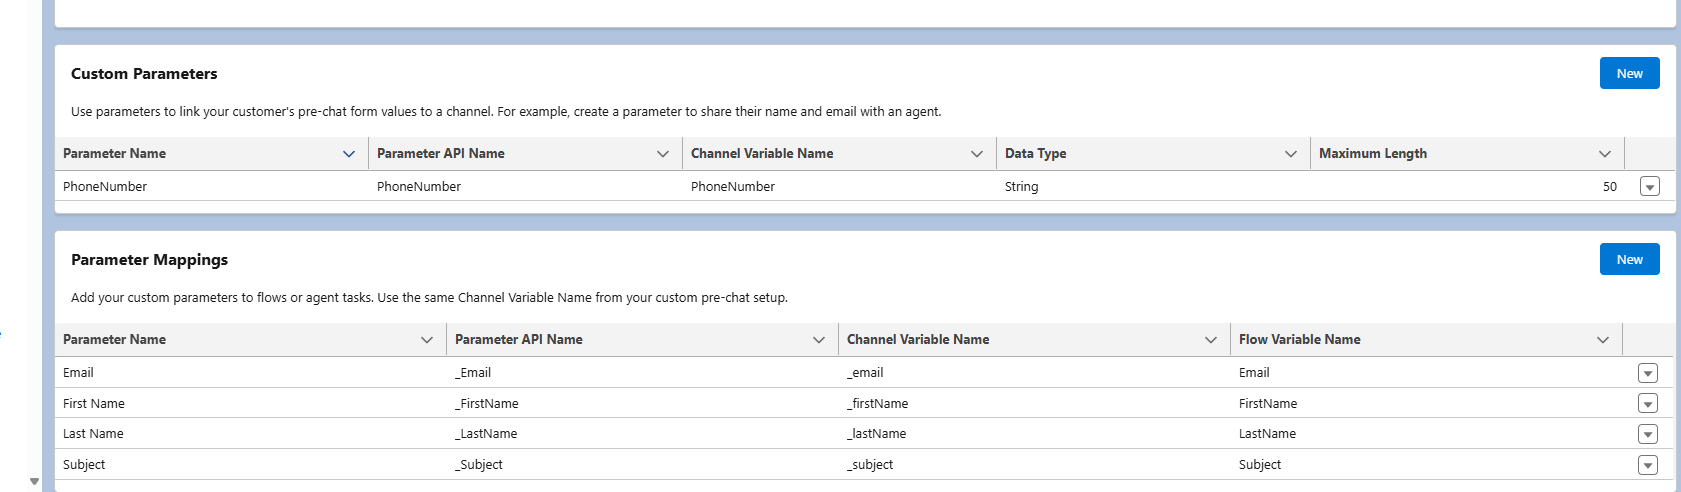
You can map all the relevant data you want as you see in the above example. The data is mapped from the form filled by the customer before entering the chat.
Map the respondent data the the Flow Variable Name in Messaging Settings.
Route work example
Our Route work example is setup as follows:
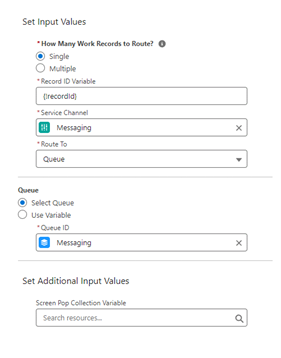
Note if you do not find a Queue under 'QueueID' it could be because you need to add 'Messaging Session' as a 'Supported Object'.
Find this under 'Setup' -> 'Users' -> 'Queues' -> Edit queue.

Map employee data with a Record triggered flow
To map data on the employee to the messaging session you need to create a flow doing that when the Messaging Session is Ended.
Trigger
Map employee data
To map the employee data you need to update the NPS Messaging Session. As you see below you can add all relevant data from the employee handling the Messaging Session.
OBS!
It is important to map the Agent Type as the The NPS controller checks for Agent or BotToAgent to accept the employee. This is done to make sure we only save employee data if the Messaging Session is handled to an agent/user
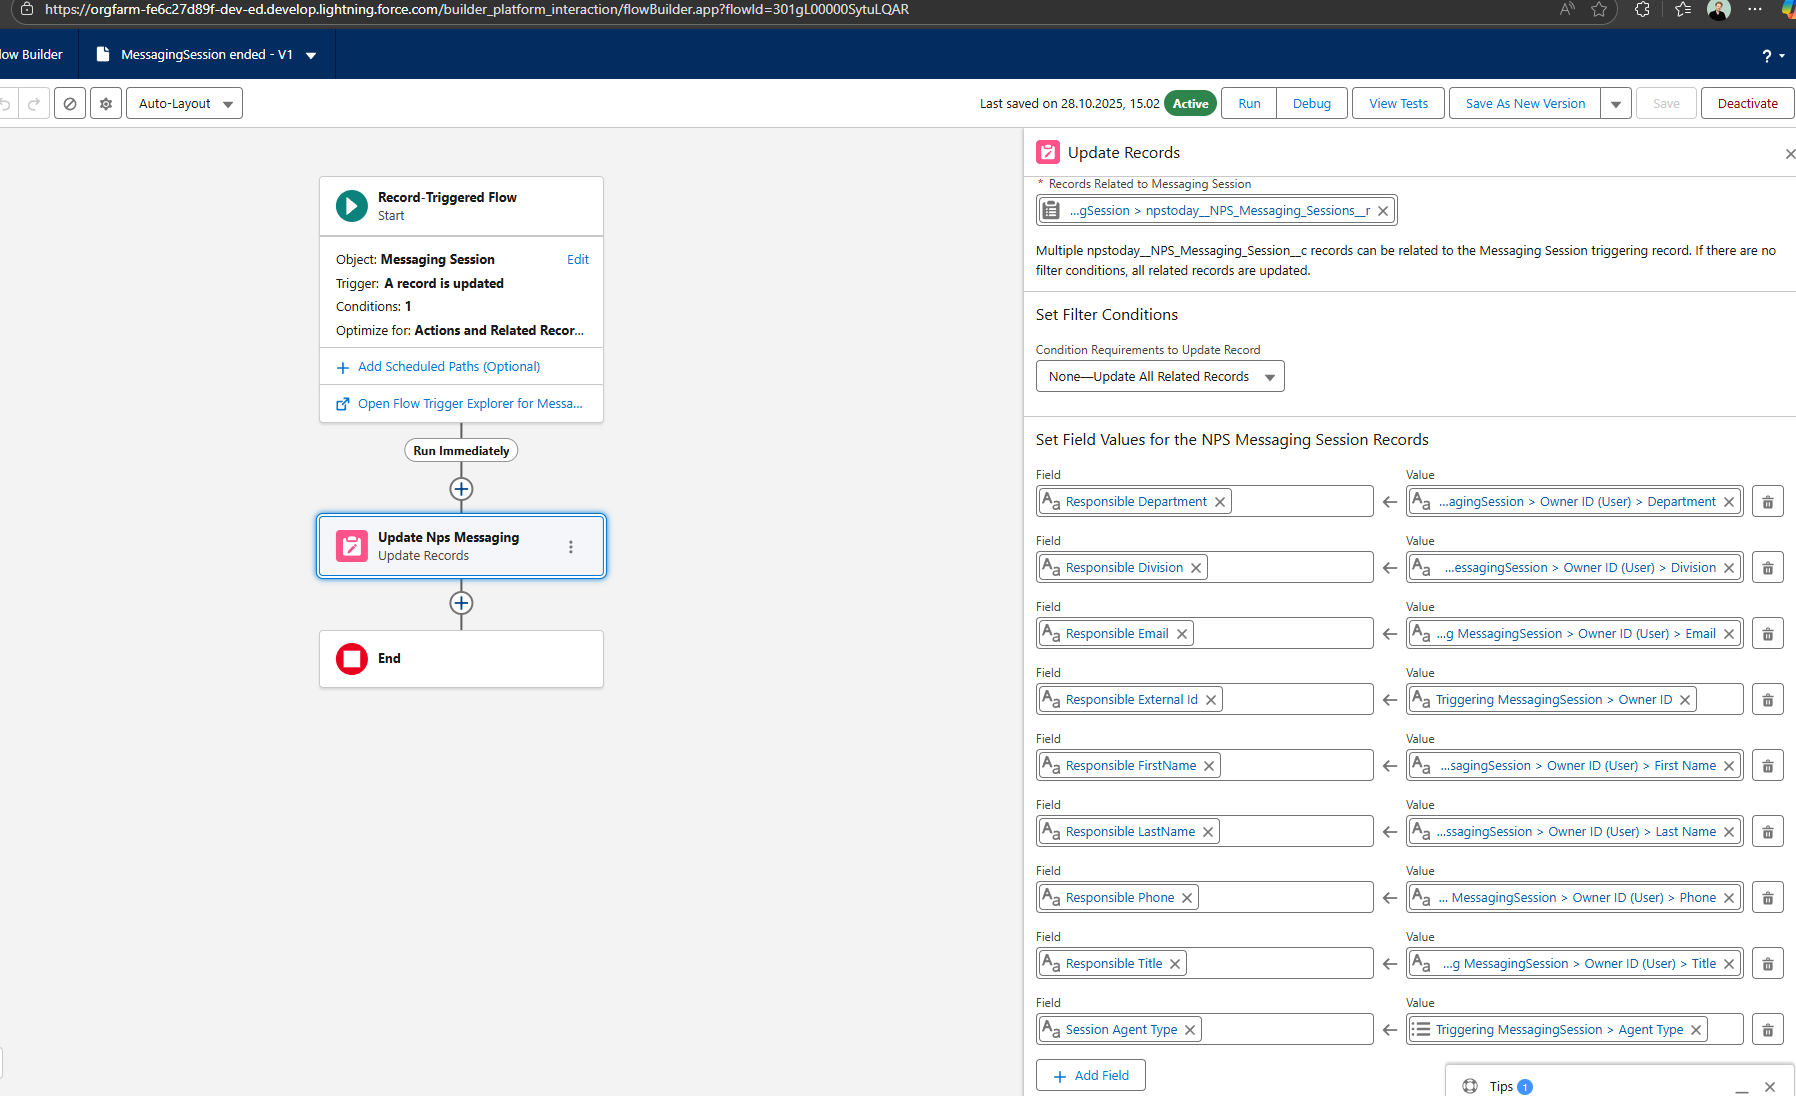
Edit or setup a channel for Messaging
Go to 'Messaging settings' in 'Service Setup'.
When in the Channel overview click edit via the drop-down to the right of the Channel you want to edit.
Under automated responses you can pick the Component created earlier.
In most survey use cases 'End Conversation' is used.
Make sure your Channel is “Active”.
Setup surveys for Salesforce Messaging
After all the necessary setup has been made, you can now start designing your survey in nps.today.
Connect our queue to a campaign in nps.today
First you need to be clear about what campaign in nps.today your Omni-Channel Flow is pointing to. This is decided by the campaign Public ID used in your Update Record component in your flow.
See Chapter about creating an Omni-Channel Flow.
See here how to find the Public ID in nps.today.
Design your Messaging survey
Designing the look of the survey is done in the campaign in nps.today. The Visualforce page in Salesforce npstoday__NPSMessagingSurvey is built so that it fetches the text from the campaign in nps.today.
You will now be guided to where in the campaign editor in nps.today you can change the relevant texts.
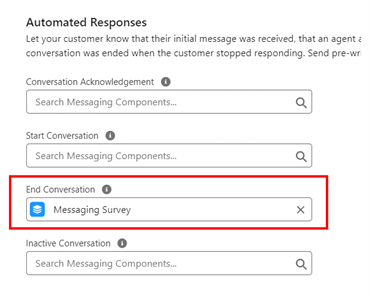
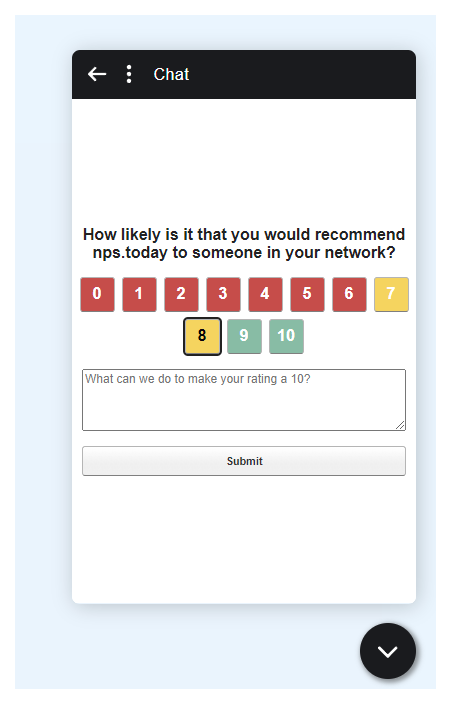
Survey Question:
Under 'Design main survey' you edit the question in the 'Question section'.
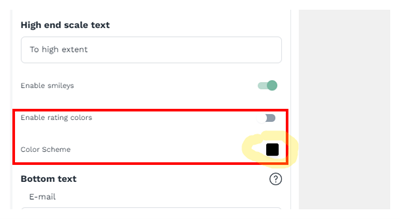
Rating boxes colors:
Under 'Design main survey' you edit the color of the rating boxes in 'Color scheme'.
You can also enable rating colors. Here 0-6 will be red, 7-8 yellow, and 9-10 green.
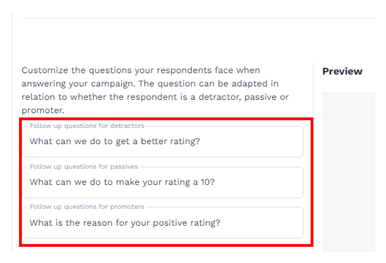
Follow-up questions:
Under 'Design main survey' you edit the follow-up question as shown below.
You most choose a question for both detractors, passives, and promoters.
Submit button:
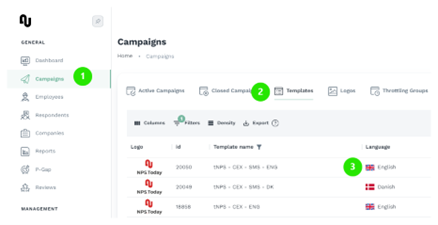
The 'Submit' button is decided from the language of the template used for creating the campaign in nps.today. This text is hard coded and cannot be changed.
You can view the language your templates in the templates overview in nps.today:
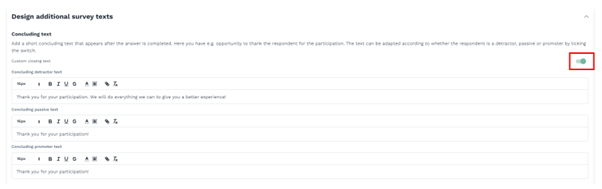
Conclusion text:
The conclusion text showing after the respondent has given an answer is edited at “conclusion text” under 'Design additional survey texts'.
Here you can enable 'Custom conclusion text' to add a conclusion text for detractors, passives, and promoters.
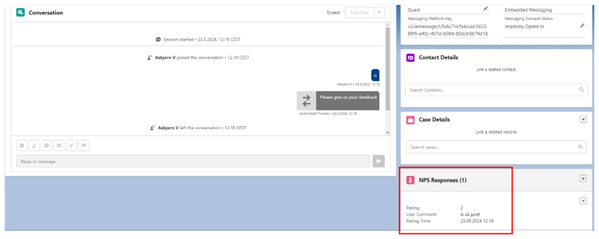
View survey responses on Messaging session
With our solution you can view responses related to a Messaging Session.
To enable this go to 'Setup' -> 'Object Manager' -> 'NPS Messaging Session' -> 'Page Layouts' -> Select your Layout.
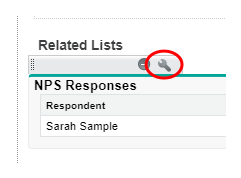
Under 'Related Lists' drag NPS Response to your preferred location.
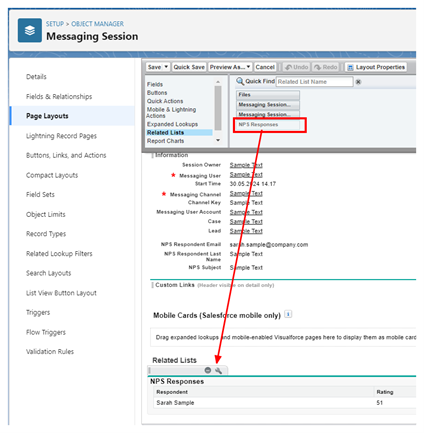
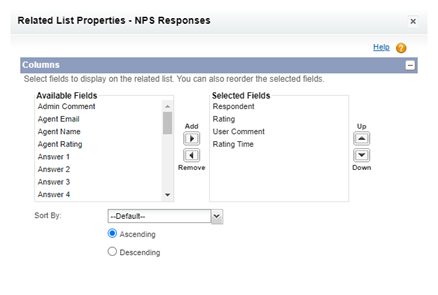
Customize the NPS Response by clicking the 'Properties sign'.
Below is a recommended setting:
Now the response related to the Messaging Session is shown on your preferred location on your 'Service Console page'.
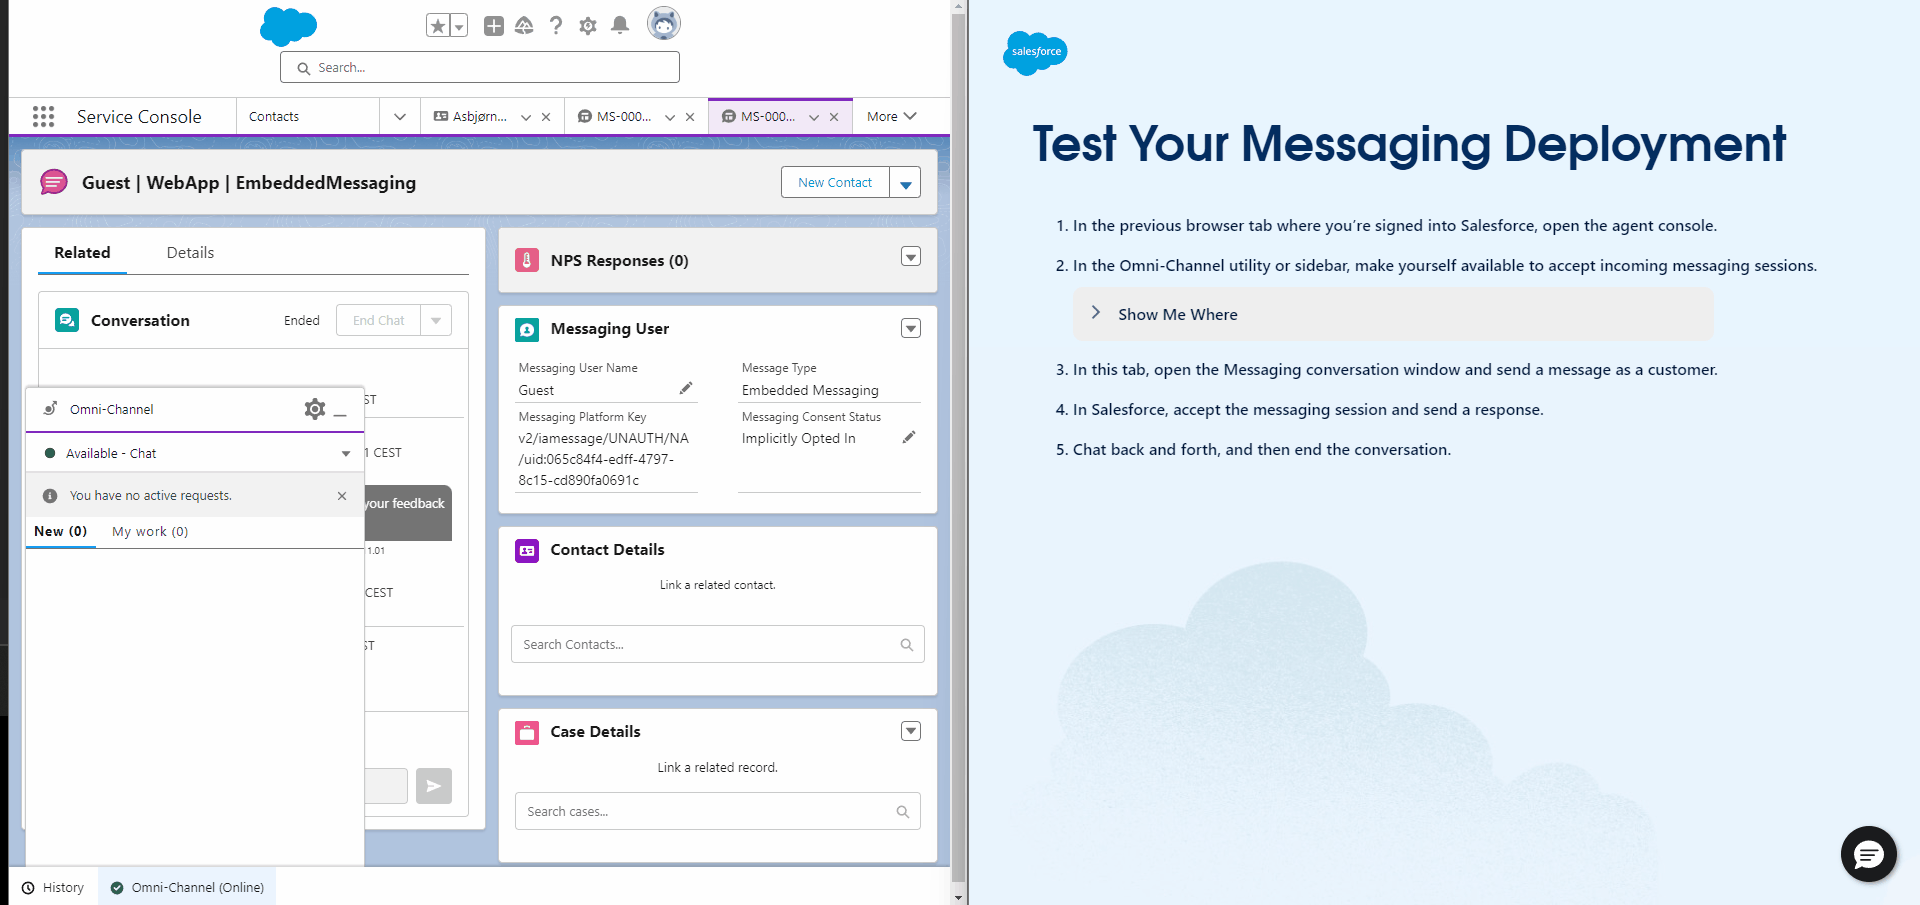
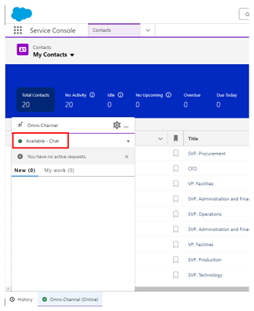
Test your setup
Before testing make sure you are available as an agent to accept Messaging Sessions. This is tested through the test function in Embedded Service Deployment, but we recommend to test it with the original webpage you are using to prompt the survey.
Go to' Service Console', click 'Omni-Channel' in the bottom, and check you are available:
To test your setup, go to your Embedded Service Deployment and click “Test Messaging”.
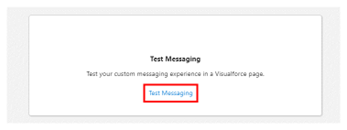
Start the conversation.
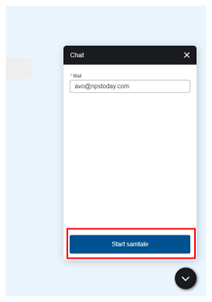
Now accept the conversation in the Service Console.
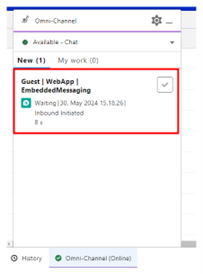
You can now start messaging and end the conversation.
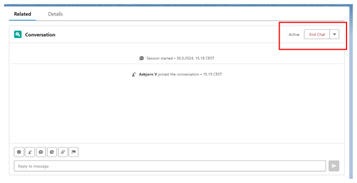
When the conversation is ended, you will get prompted with a survey.
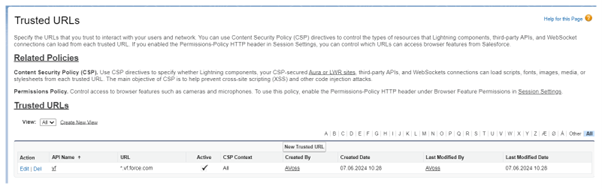
Trusted URLs
If you are having issues with showing the Salesforce Messaging survey please check if below is setup on your Org.
Trusted URL
It is a good idea to check if your URL(s) are trusted to interact with users and networks.
Go to 'Setup' -> 'Trusted URLs' and check if your external site is trusted.
For testing purpose, we have trusted *vf.force.com, which then trusts all URLs, that ends with vf.force.com.
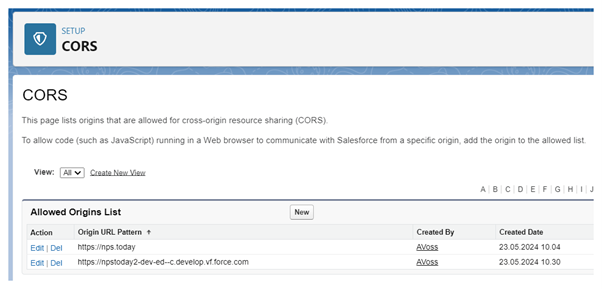
CORS
It is a good idea to check if your external link is listed on CORS setup to allow code on the web browser.
Go to 'Setup' -> 'CORS'.
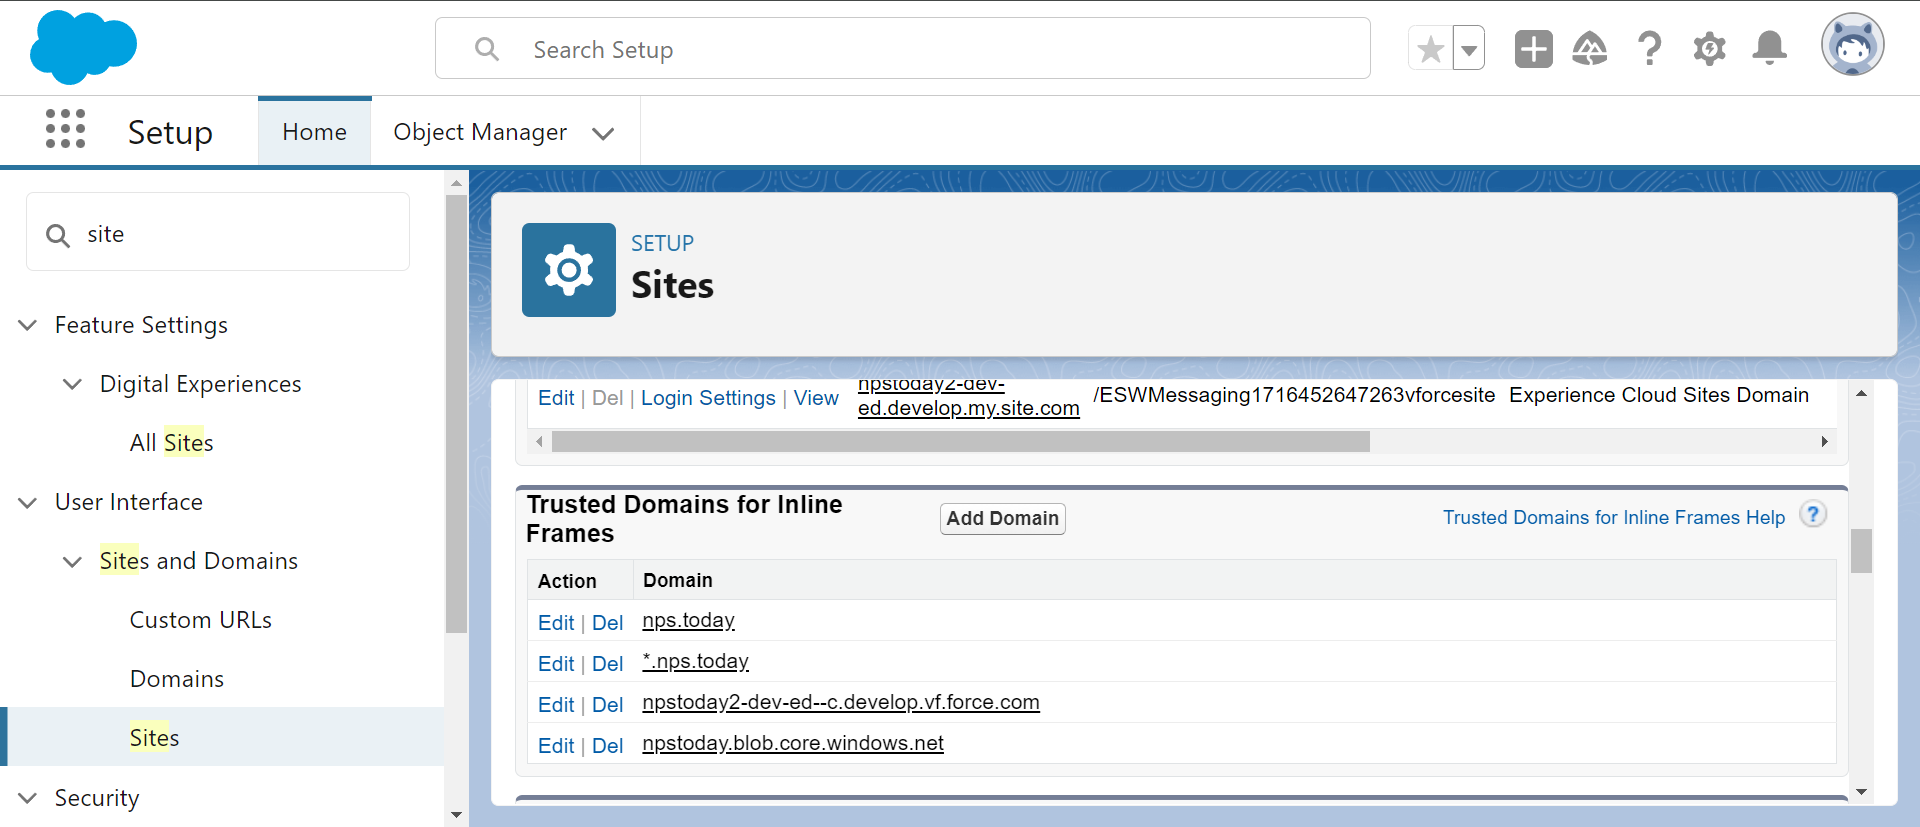
Sites
Also check if your external link is listed under 'Sites'.
Go to 'Setup' -> 'User Interface' -> 'Sites and Domains' -> 'Sites'. Under 'Sites' select your 'Site label'.
When your site label is selected you should add your link under 'Trusted Domains for Inline Frames'.