Dixa Integration Guide
Introduction
nps.today for Dixa offers automatic survey triggers on conversation events, customer experience insight on your conversation, and P-GAP (Perception Gap) directly into your Dixa system. Our Dixa integration is an extension of your existing nps.today account and customer loyalty program.
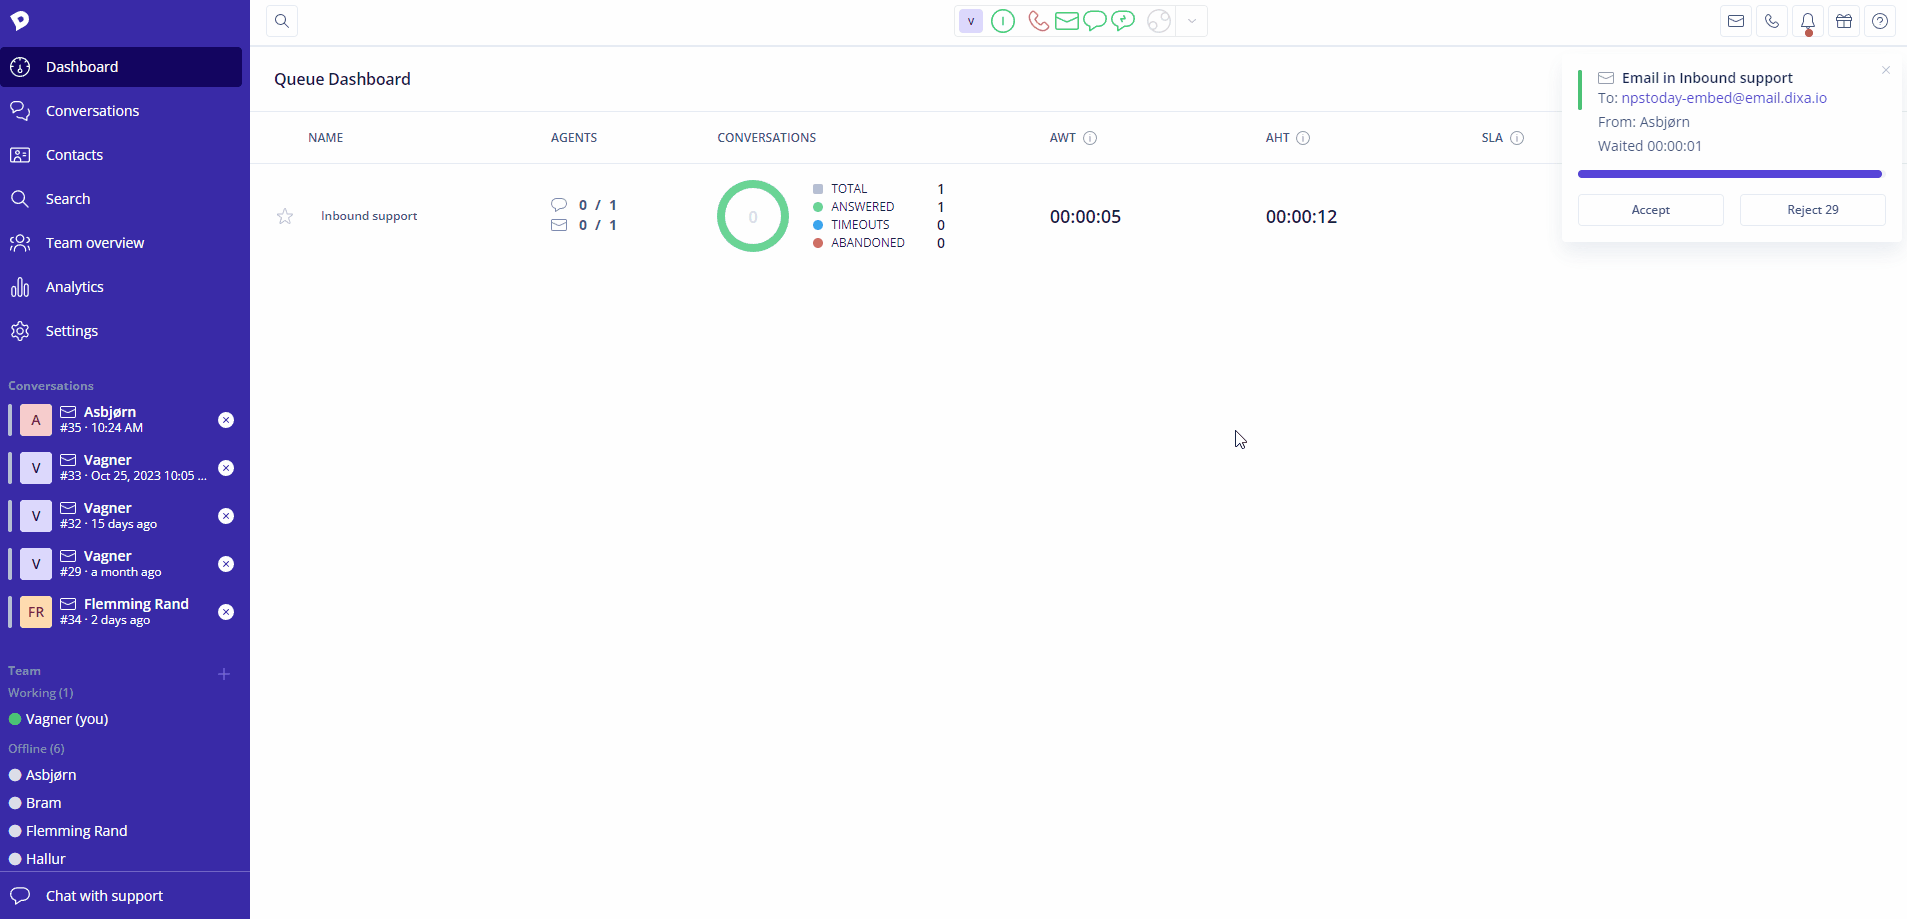
Below GIF demonstrates how an agent will see responses from nps.today in Dixa. It will also show how an agent adds a P-GAP score. Read more about P-GAP here.
Prerequisites
- Have an nps.today subscription
- IVR in nps.today is enabled
- Have a Dixa subscription
- Login with as an Administrator in Dixa
- Login with as an Administrator in nps.today
Get Customer experience insights
With our Feedback App the Agent can see customer experience insights directly into your conversations in Dixa. If you need more technical information of the Feedback App please click here.
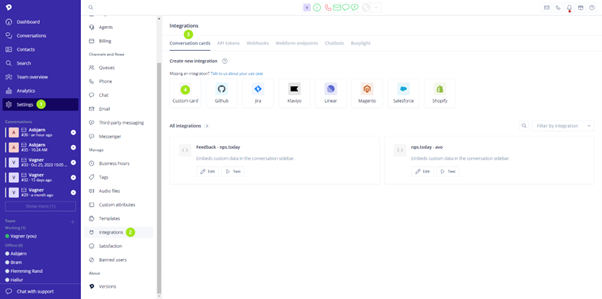
Set up Custom Card
To set-up the Feedback App in Dixa go to Setting -> Integration -> Conversation cards -> Custom Card.
In the Custom Card set up add the following information:
Title: Give it a proper name
Method: POST
Hook URL:
https://api.nps.today/employees/token

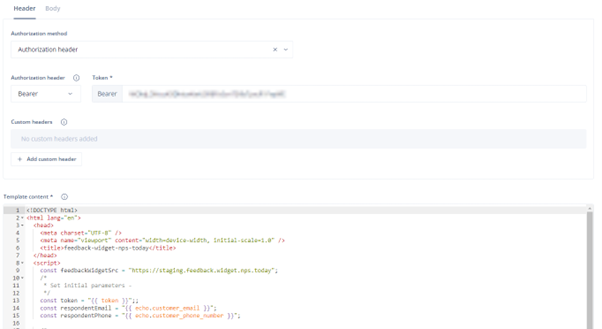
Under Header put in the following:
Authentication method: Authorization header
Authorization header: Basic
Username: ApiKey
Password: Your nps.today API Key
Template content:
HTML Content
<!DOCTYPE html>
<html lang="en">
    <head>
        <meta charset="UTF-8" />
        <meta name="viewport" content="width=device-width, initial-scale=1.0" />
        <title>feedback-app-nps-today</title>
    </head>
    <script>
        const feedbackAppSrc = "https://feedback.nps.today?operationMode=integration";
        /*
        * Set initial parameters -
        */
        const token = "{{ token }}";
        const respondentEmail = "{{ echo.customer_email }}";
        const respondentPhone = "{{ echo.customer_phone_number }}";

        /*
        * If you want to change the parameters after the Feedback App is loaded,
        * you can do so by dispatching a custom event - see below
        */
        /*
        document.body.dispatchEvent(
            new CustomEvent("feedback-app-nps-today-update-parameters", {
                parameters: {
                    respondentEmail: newRespondentEmail,
                    respondentPhone: newRespondentPhone,
                },
            })
        );
        */
    </script>
    <body>
        <iframe title="feedback-app-nps-today" id="feedback-app-nps-today" width="100%" height="600px" frameborder="0">
        </iframe>
        <script>
            const iframeElement = document.getElementById("feedback-app-nps-today");
            const setFeedbackAppParameters = (parameters) => {
                iframeElement.contentWindow.postMessage(
                    {
                        action: "SET_PARAMETERS",
                        parameters: { ...parameters },
                    },
                    "*" // use feedbackAppSrc attribute, if inviornment allows
                );
            };
            window.addEventListener("message", (event) => {
                if (event.data && event.data.action === "FEEDBACK_WIDGET_READY") {
                    setFeedbackAppParameters({
                        token: token,
                        respondentEmail: respondentEmail,
                        respondentPhone: respondentPhone,
                    });
                }
            });
            // Listen for custom events to provide the Feedback App with new data
            document.body.addEventListener("feedback-app-nps-today-update-parameters", (event) => {
                setFeedbackAppParameters({
                    ...event.parameters,
                });
            });
            iframeElement.src = feedbackAppSrc;
        </script>
    </body>
</html>
Under Body put in the following:
Content type: application/json
Body:
Body Content
{
    "employeeEmail": "{{agent_email}}",
    "customer_email": "{{customer_email}}",
    "customer_phone_number": "{{customer_phone_number}}"
}

{{agent_email}} placeholder meaning
The "{{agent_email}}" placeholder will not provide the email of the logged in agent. It provides the email of the agent assigned to the conversation that is currently being viewed. This means that it is possible for one agent to see responses that another agent is responsible for in nps.today. If this behaviour is undesired, please read the section "Disable Personal Page responses" below.
Disable Personal Page responses(Optional)
If you don't want to display responses related to the assigned agent for the conversation that is being viewed, it can be disabled by not setting an employee email in the body. The Personal Page will still be displayed, but no responses will be available. Update the body content to the following:
Body Content(No Personal Page content)
    {
        "customer_email": "{{customer_email}}",
        "customer_phone_number": "{{customer_phone_number}}"
    }
Now Click “Save changes”
Test your Custom Card
You can test your Custom Card to see if it works.
In the Conversation Cards overview click “Test” on your Custom Card.
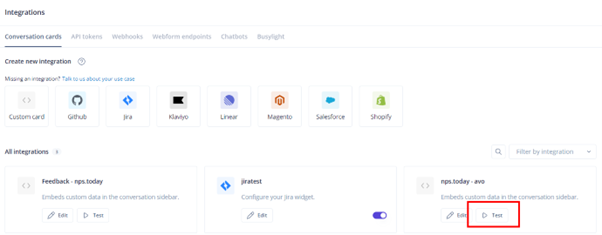
Now add a Parameter like the customer email or phone number and click “Test”.
You can find more info about Dixa placeholders on the Dixa documentaion page.
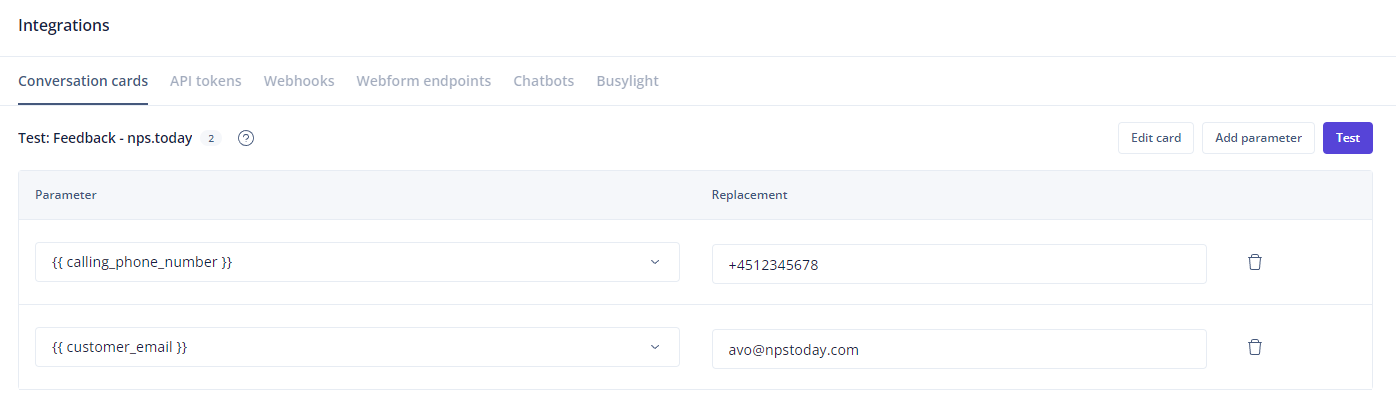
If your result looks similar to the picture below the test was a success.

The Conversation Card is now visible on your Conversations.
Trigger a survey
With this integration you can set up automatic survey triggers on events with Dixa Webhooks.
If you need to add more logic or conditions, other than e.g. conversation closed, you can use a third party system like Microsoft Power Automate. See this guide for more information.
Assigned agent on conversation is required
To send a survey it is required to have an assigned agent on the conversation.
Set-up your Dixa webhook
Log in to your Dixa Account.
Go to Settings -> Integration -> Webhooks. Now add a new webhook.
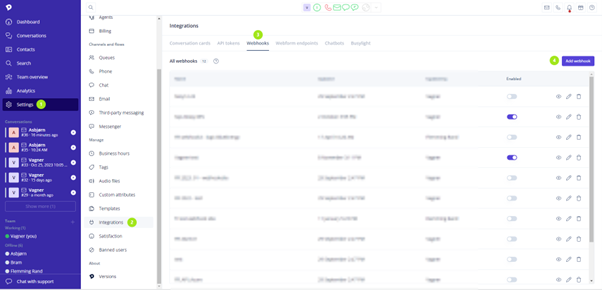
When setting up the webhook you should put in the following information:
Name: give it a proper name
Webhook URL:
https://functions.nps.today/api/dixa/relay
Enable Authentication and select “Token”
Token: Your nps.today API Key
Event: Closed
When saving the webhook you created the connection to nps.today.
Webhook data
Upon the occurrence of a Close Event, a webhook request transmits transaction data directly to the nps.today API. The system programmatically processes this request by mapping the provided data points to the relevant Campaign Member attributes. This successful mapping serves as the primary trigger for the automated delivery of the survey.
Below is a representation of the webhook structure and the mapping of data to the campaign member in nps.today.
Closed event payload
Dixa occasionally changes the way their data is structured. To make sure you have the latest details, please visit the Dixa developer documentation. Their documentation will always reflect the most recent version of the data they send to nps.today.
Below is a request example on a Close event:
{
"eventId": "string",
"eventFqn": "string",
"eventVersion": "string",
"eventTimestamp": "2026-02-13T00:00:00Z",
"organization": {
    "id": "string",
    "name": "string"
},
"data": {
    "conversation": {
    "csid": 123,
    "channel": "string",
    "status": "string",
    "direction": "string",
    "queue": {
        "id": "string",
        "name": "string"
    },
    "contactPoint": "string",
    "requester": {
        "id": "string",
        "name": "string",
        "email": "string",
        "phone": "string",
        "roles": ["string"]
    },
    "assignee": {
        "id": "string",
        "name": "string",
        "email": "string",
        "phone": "string",
        "roles": ["string"]
    },
    "subject": "string",
    "tags": [],
    "createdAt": "2026-02-13T00:00:00Z"
    }
}
}
Campaign member mapping
When nps.today receives the request data is mapped to the campaign member as follows:
data.conversation.requester.name -> campaignMember.Respondent.FirstName
data.conversation.requester.phone -> campaignMember.Respondent.Phonenumber
data.conversation.requester.email -> campaignMember.Respondent.Email
data.conversation.requester.id -> campaignMember.Respondent.ExternalId
data.conversation.assignee.name -> campaignMember.ResponsibleEmployee.FirstName
data.conversation.assignee.phone -> campaignMember.ResponsibleEmployee.PhoneNumber
data.conversation.assignee.email -> campaignMember.ResponsibleEmployee.Email
data.conversation.csid => campaignMember.ExternalId
data.conversation.csid => campaignMember.custom.dixaConversationId
Setting up Dixa IVR in nps.today
By setting up IVR in nps.today you create the connection between your queues in Dixa and your campaigns in nps.today. This means that you decide what survey should be triggered when a queue conversation is closed.
Before setting up the IVR you need to find your Queue Id and Dixa API Key.
Queue Id
Warning
You can't find the Queue Id if you are using the desktop client or mobile app. Please go to the web app or contact Dixa support.
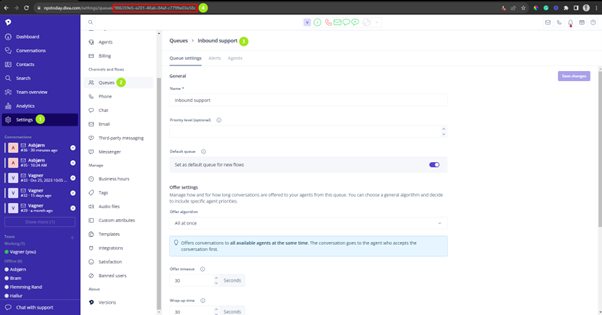
Find the Queue Id by going to Settings -> Queues and select the Queue that you would like to connect to a campaign in nps.today.
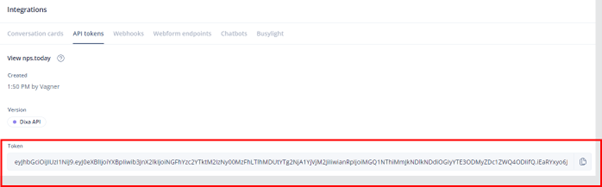
Dixa API Key
Go to Settings -> Integrations -> API tokens and click “Add API token”.
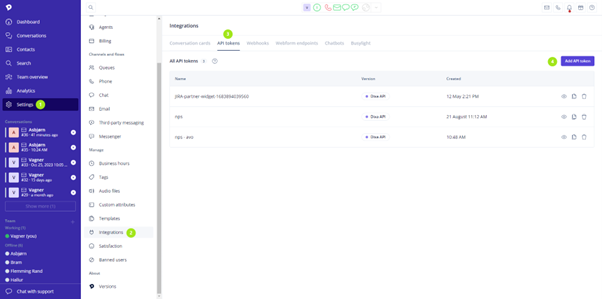
Give it a proper name and click “Save changes” and get your Dixa API Key (Token).
IVR set-up
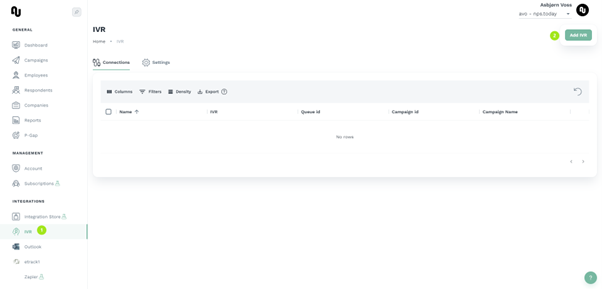
Log in to your nps.today account with an Admin user.
Go to IVR and click "Add IVR" if IVR is not visible please contact nps.today Support at [email protected]
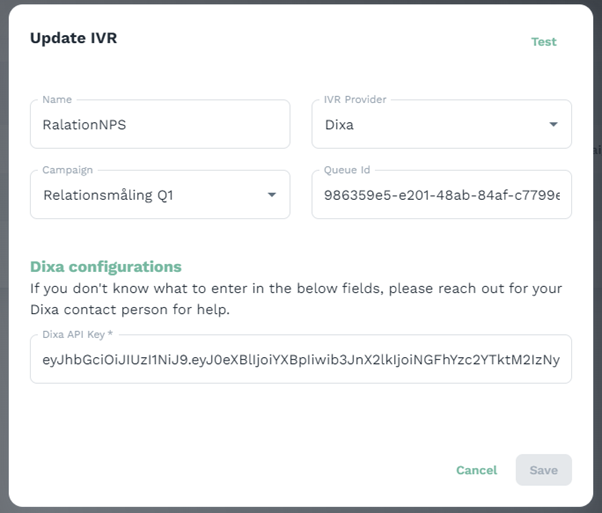
Now put in the following information in the IVR set-up:
Name: Give it a proper name
IVR Provider: Dixa
Campaign: Select the campaign that should trigger a survey
Queue Id: Put in the Queue Id from Dixa
Dixa API Key: Put in the API Token from Dixa
Click “Save”
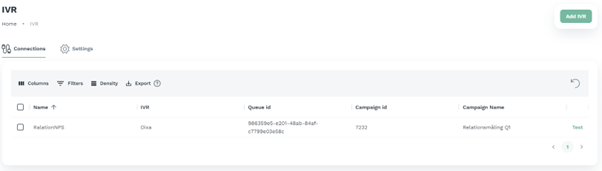
Now every time we close a conversation in the queue with Queue Id = 986359e5-e201-48ab-84af-c7799e03e58c we trigger a survey from the campaign Relationsmåling Q1 with the CampaignID 7232.
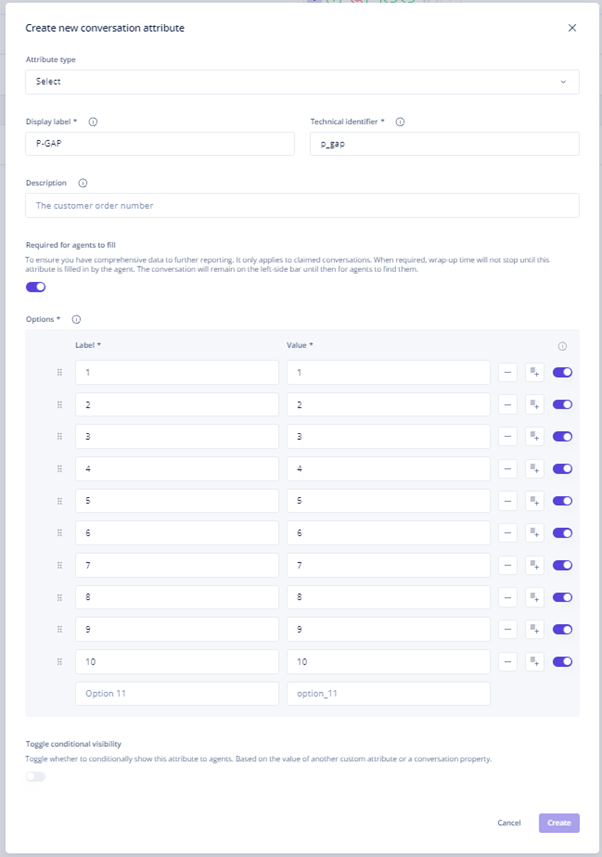
Set-up P-GAP
By adding P-GAP you enable the agent to give a rating, on how they perceived the conversation in Dixa that is about to close, on a scale from 0 to 10.
Go to Settings -> Custom attributes and click “Add attribute”
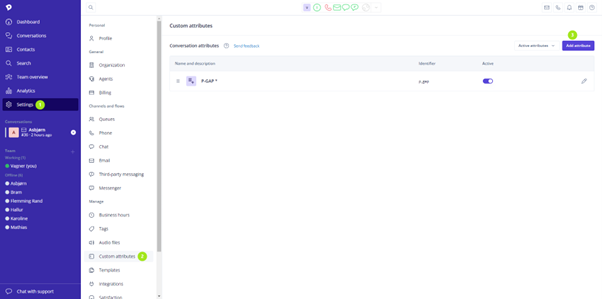
Put in the following information:
Attribute type: Select
Display label: Give it a proper name
Technical identifier: p_gap
Required for agents to fill: Enable
Add Label and Value from 0 to 10
And click “Create”.
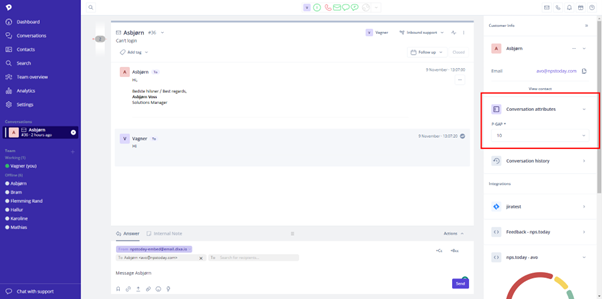
A P-GAP rating is now required from the Agent before they can close a conversation in Dixa and trigger a survey.
Congratulations
Now you have set-up the nps.today integration to Dixa. If you have any comments or questions regarding this integration, please contact [email protected].