Installing your Salesforce Plug-in
About
Salesforce features
This document describes how to setup and operate the “nps.today for Salesforce” app used to make selected nps.today features available from within Salesforce.
The intended audience for this document is Salesforce Admins with basic configuration experience.
Note that the User setting up “nps.today for Salesforce” needs to have the right Permissions set from the chapter Grant access to users.
Installation
Basic install
After completing the following steps, your nps.today instance is connected to your Salesforce instance, but no features have been made available to end-users through user interfaces or automations.
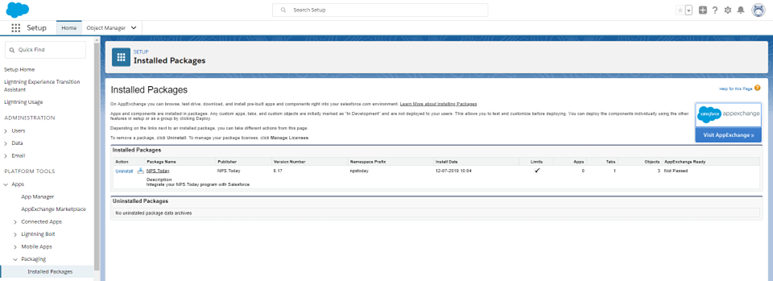
Install package
Install the nps.today package using the installation link provided by your nps.today contact by. Install through your preferred method – end result is the same:
Browser install
- Log into the Salesforce environment you want to install to
- In your browser URL paste in the install link.
https://{org_domain}/packagingSetupUI/ipLanding.app?apvId={packageAlias}
- Follow the standard Salesforce package install process. Select “Install for Admins Only”
- After the installation is completed, you’ll end up here:
SFDX CLI install
sfdx force:package:install -u <sfdx org alias> -w 1000 --securitytype AdminsOnly -p <04t… package id received from your nps.today contact>
Grant access to users
For you to set up the nps.today package you need to enable the below permission sets for your Salesforce user.
To grant users access to use nps.today features in Salesforce, it is recommended to rely on the nps.today provided permission sets and assign them to relevant users.
It is also required for the user setting up the nps.topday package to assign the below permission sets.
| Permission set | Description |
|---|---|
| nps.today viewer | Most users should have this permission set or the equivalent rights through other means. Allows user to view nps.today data |
| nps.today requester | Allows user to request nps.today requests from individuals |
| nps.today admin | Allows user to setup and administer the integration to |
| nps.today mass requester | Allows user to access the UI to request nps.today ratings from multiple contacts in one go (list view button) |
Go to Setup -> Users (under ADMINISTRATION) -> Permission sets
Assign each nps.today permission sets to relevant users.
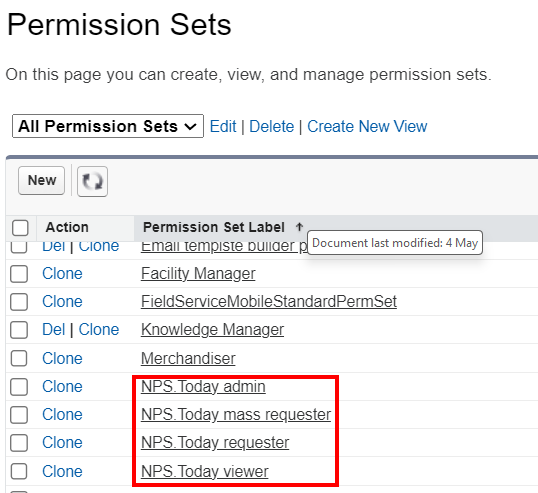
Click Permission set -> Manage Assignments -> Add assignments -> assign relevant Users.
Configure package
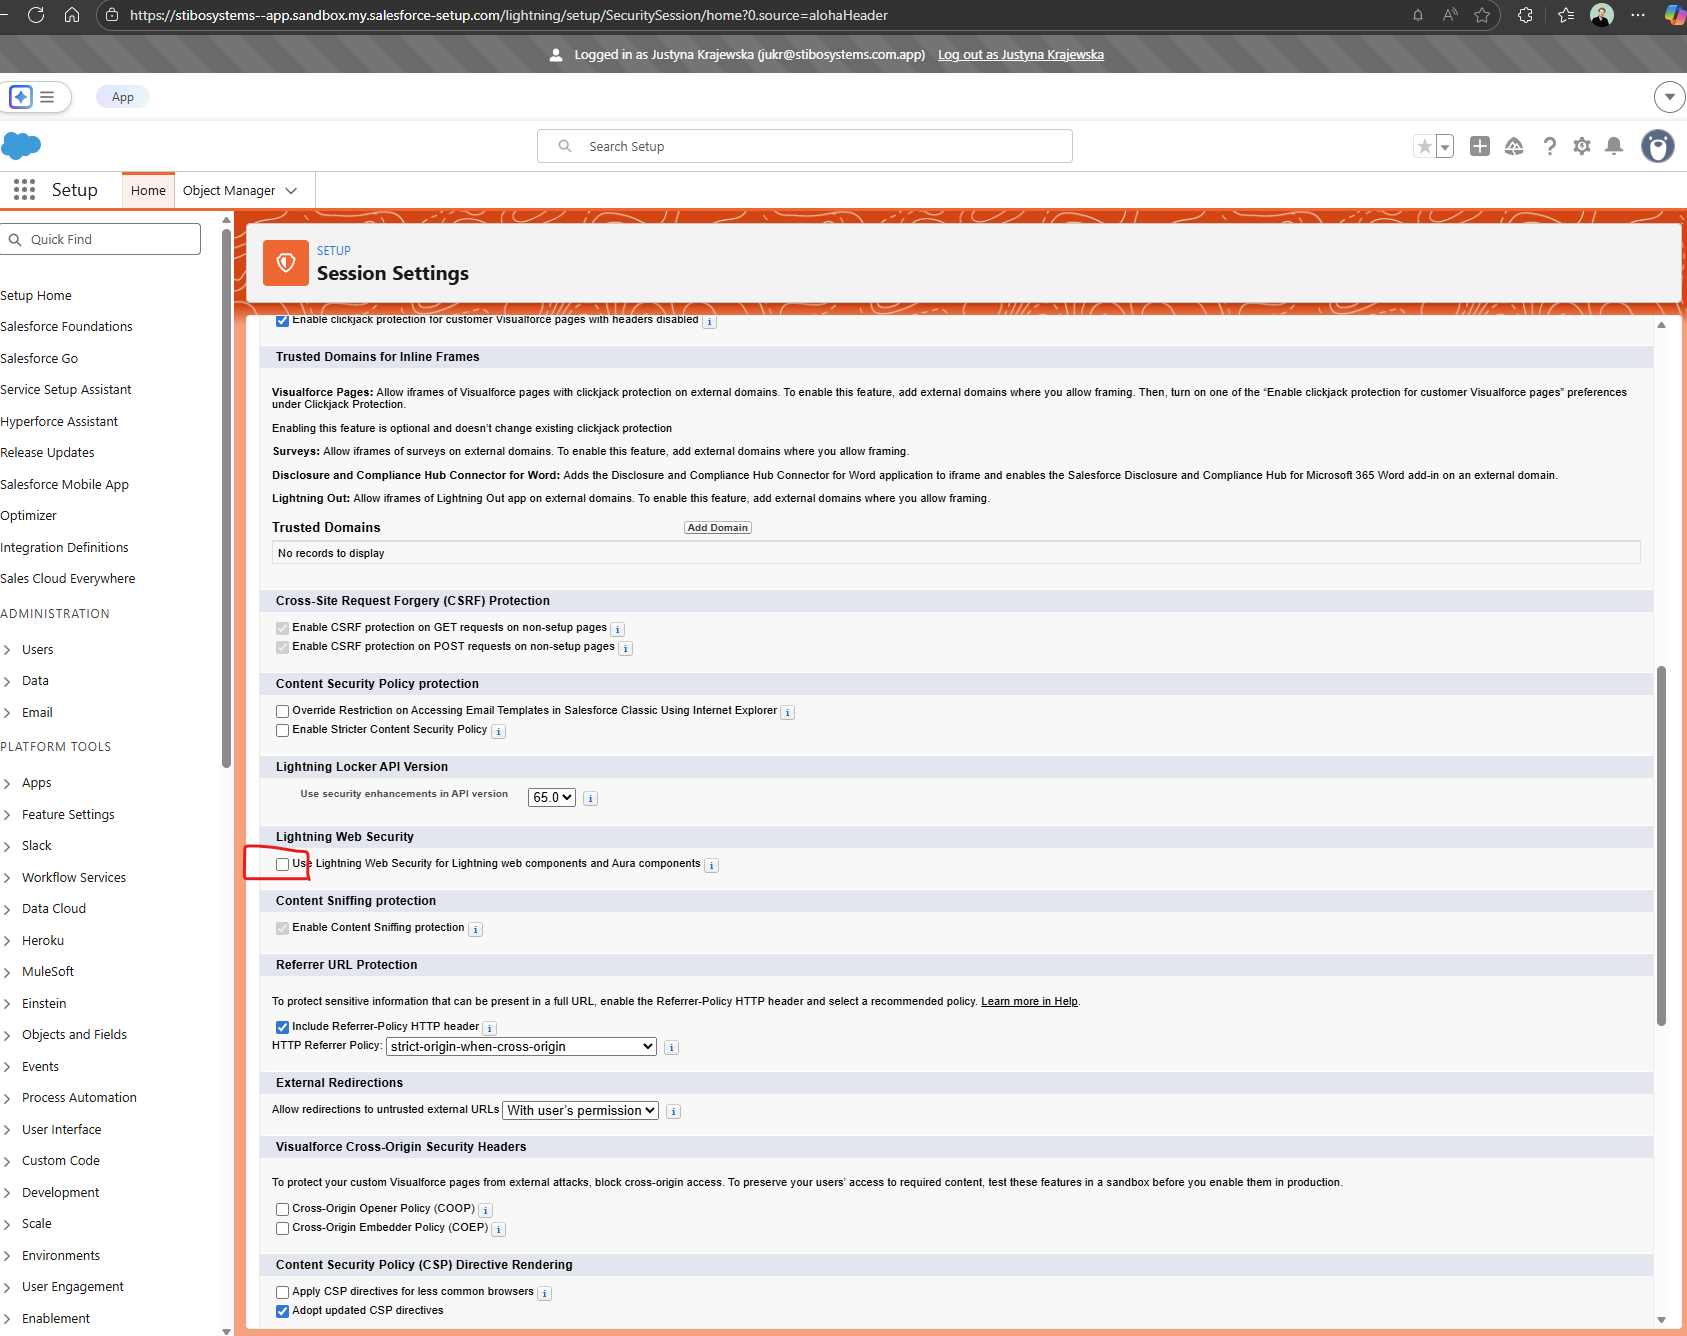
Enable Lightning Web Security for optimal performance
For optimal performance and security, please ensure Lightning Web Security is enabled  . If it is disabled, charts on Lightning pages will not render, and additional components of the integration may fail to operate as expected.
-
Here you will need an API key and a campaign ID from nps.today. As an admin, access “Setup -> security -> named credentials. Select the NPS environment you wish to call. In most cases the production environment will be selected. Next you need to edit the Named Credentials.
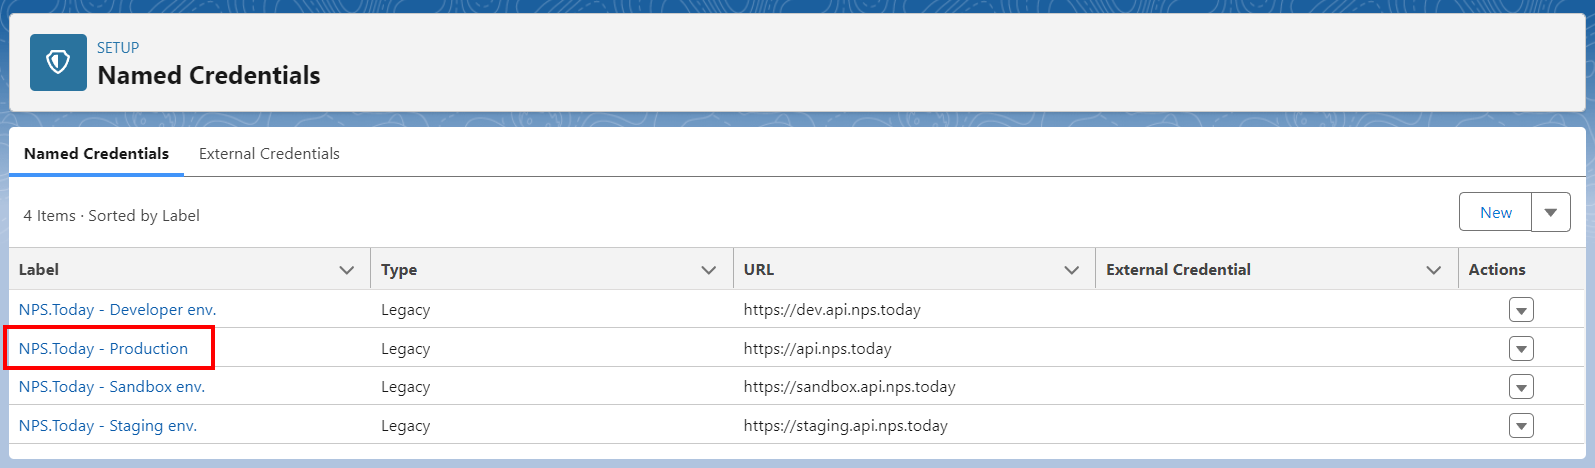
Edit the Named Credential.

Insert the API-key generated from the nps.today system in the Password section. Click “Save”.
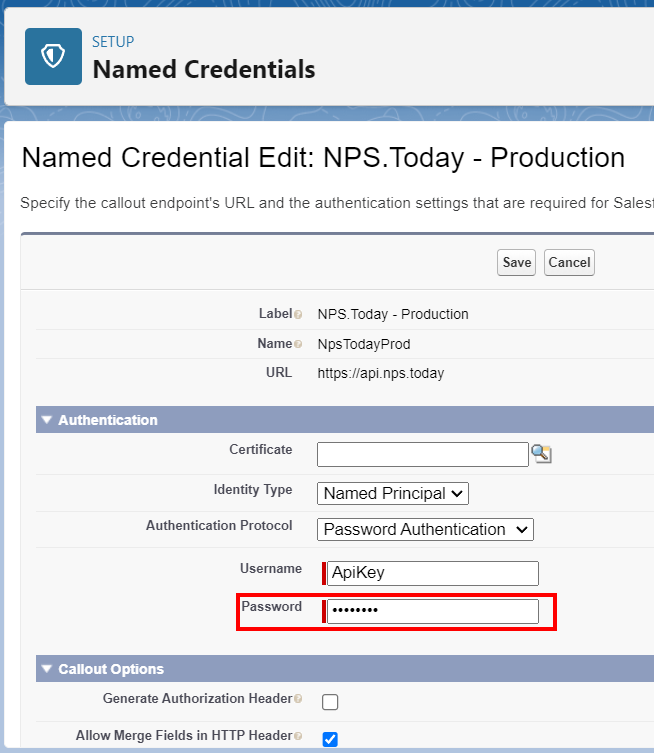
Make sure all three Callout boxes is enabled.

Click "Save".
-
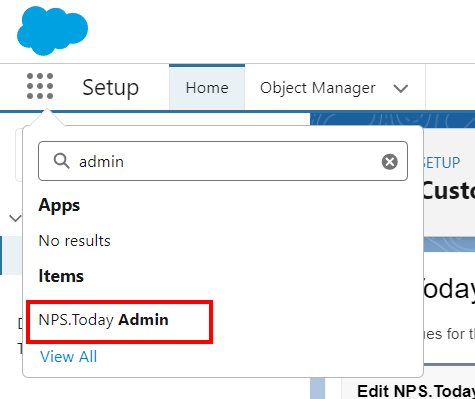
Now go to the app launcher. As an admin this is the place to set up general and sync setting.2. Now go to the app launcher. As an admin this is the place to set up general- and sync setting.
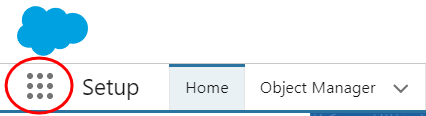
Locate the tab nps.today Admin.
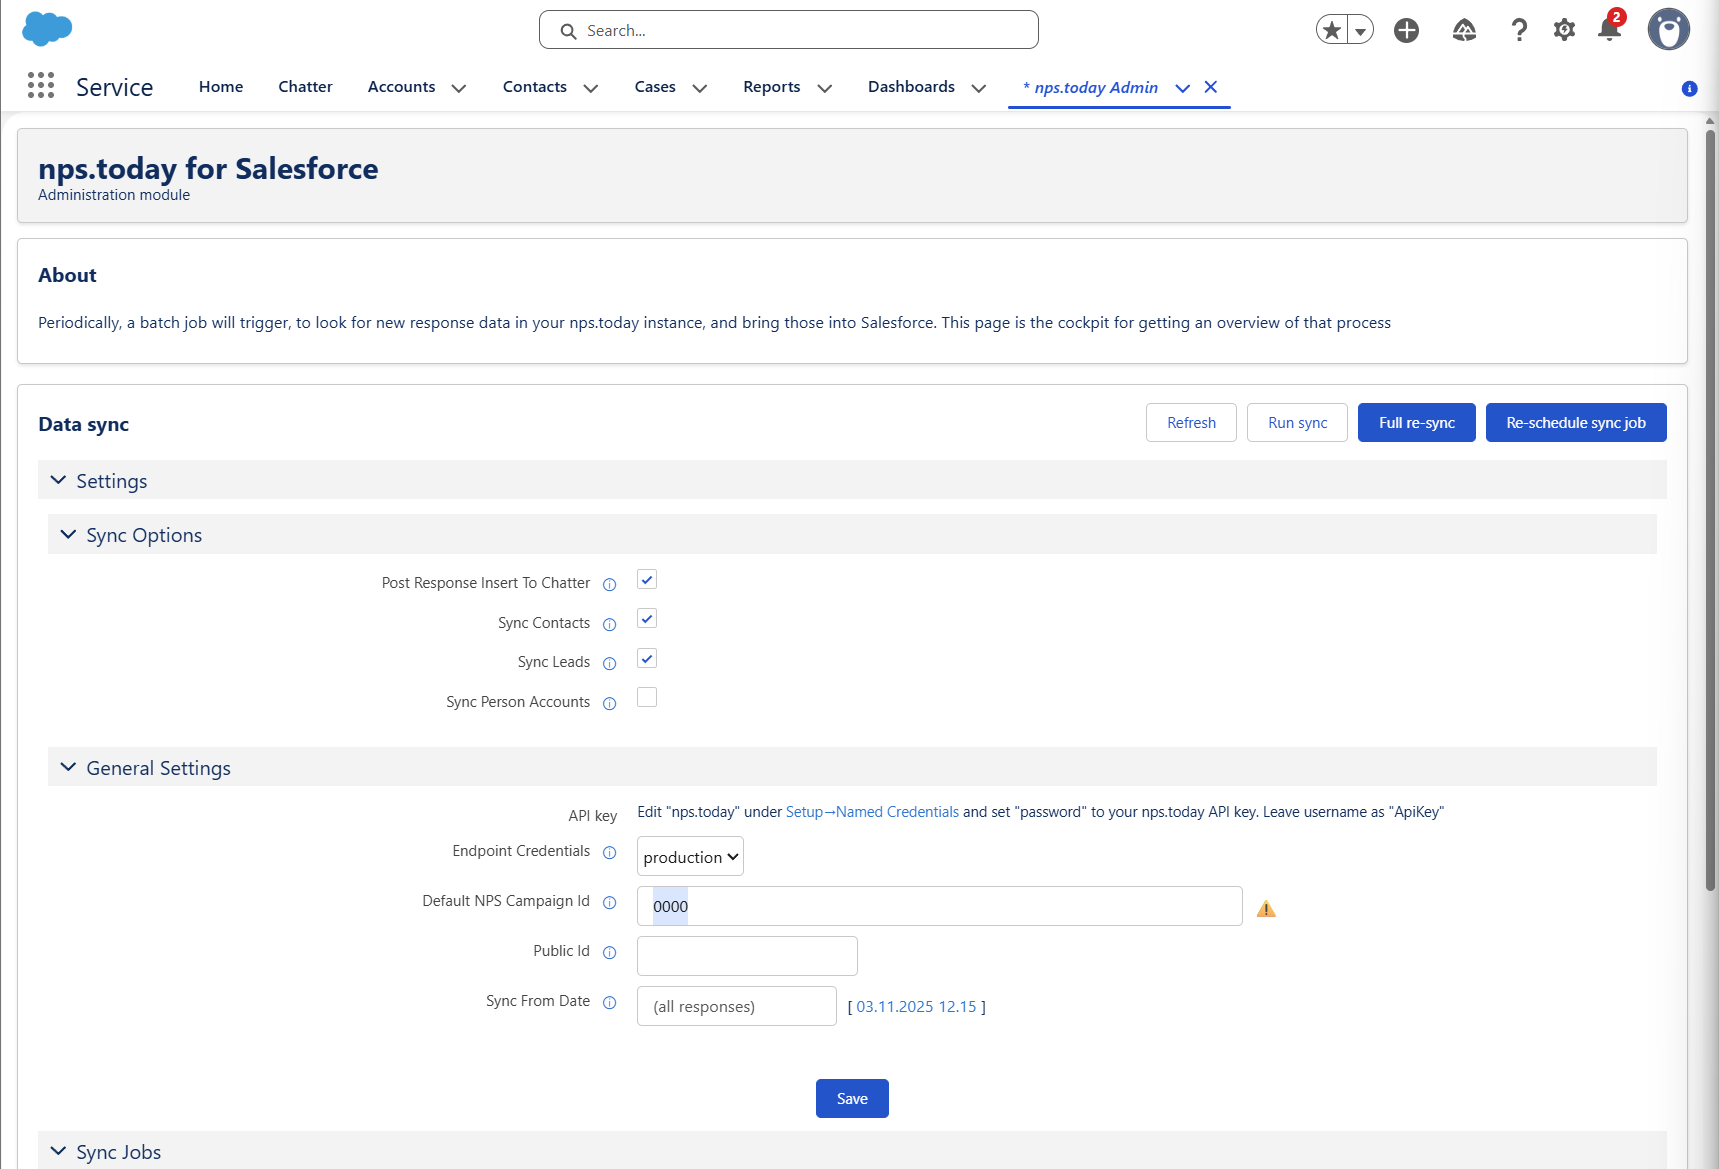
Sync Options
Here you can choose what object nps.today should sync feedback data to. If you trigger surveys based on Contacts, the "Sync Contacts" should be enabled.General settings
Here you can navigate to Named credential if you have not already added your API key here.Endpoint Credentials:
This should always be set toProduction.Default NPS Campaign Id:
Put in a Campaign ID from nps.today. This is not required do "1234" is fine.Public Id:
This is the Public ID of an nps.today campaign. This is only relevant if you are using nps.today for Salesforce Messaging.Sync From Date:
If there is a date here the plug-in will not sync responses created before this date.Now click Save
Error when clicking Save?
If you have any errors clicking save, make sure you are a Salesforce Admin and your user has the permission set nps.today admin.
Run initial sync and schedule periodic sync
Navigate to the nps.today Admin page
Click the Full re-sync button to ensure a full sync of NPS responses (npstoday__Response__c records)
Click Refresh button to follow the job execution in the Sync job executions table.
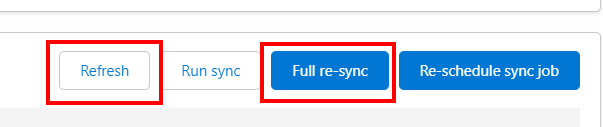
Job is expected to complete successfully and the Last run record count is expected to reflect the total number of NPS ratings in your nps.today system.
Now click the button Re-schedule sync job to schedule NPS rating sync to run periodically and sync new responses into Salesforce every hour.

Ensure the scheduled execution is added to the “Sync schedule” table.

Setup functionality
Each of the following sub sections can be performed independently of each other and will allow Salesforce end-users to work with nps.today features from Salesforce. The setup steps described should be seen as examples of the most typical uses of the nps.today for Salesforce app but not a comprehensive list of how the components provided by the app can be utilized by an advanced Salesforce Admin or Developer.
Add charts to Account Lightning pages
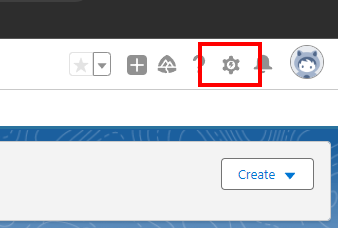
Edit relevant Account lightning pages (e.g. through Setup -> User Interface (under PLATFORM TOOLS) -> Lightning App Builder) – You can also go to a random account and press the “cog wheel” in the top right corner and click Edit page.
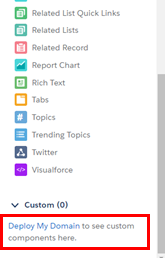
In the Lightning Components sidebar under Custom – Managed you will find the nps.today components. If you haven’t deployed a domain, you must do that to access the Custom – Managed components.
Click Deploy My Domain and follow the standard Salesforce process.
When your domain is deployed you should see the components in Custom – Managed. Drag them into the page wherever you like. The following components are available:
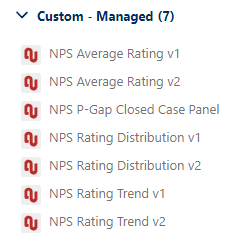
• NPS Average Rating
• NPS Rating Distribution
• NPS Rating Trend
• NPS P-Gap Closed Case Panel - This is used for P-GAP configurations on Cases
It can look like this:
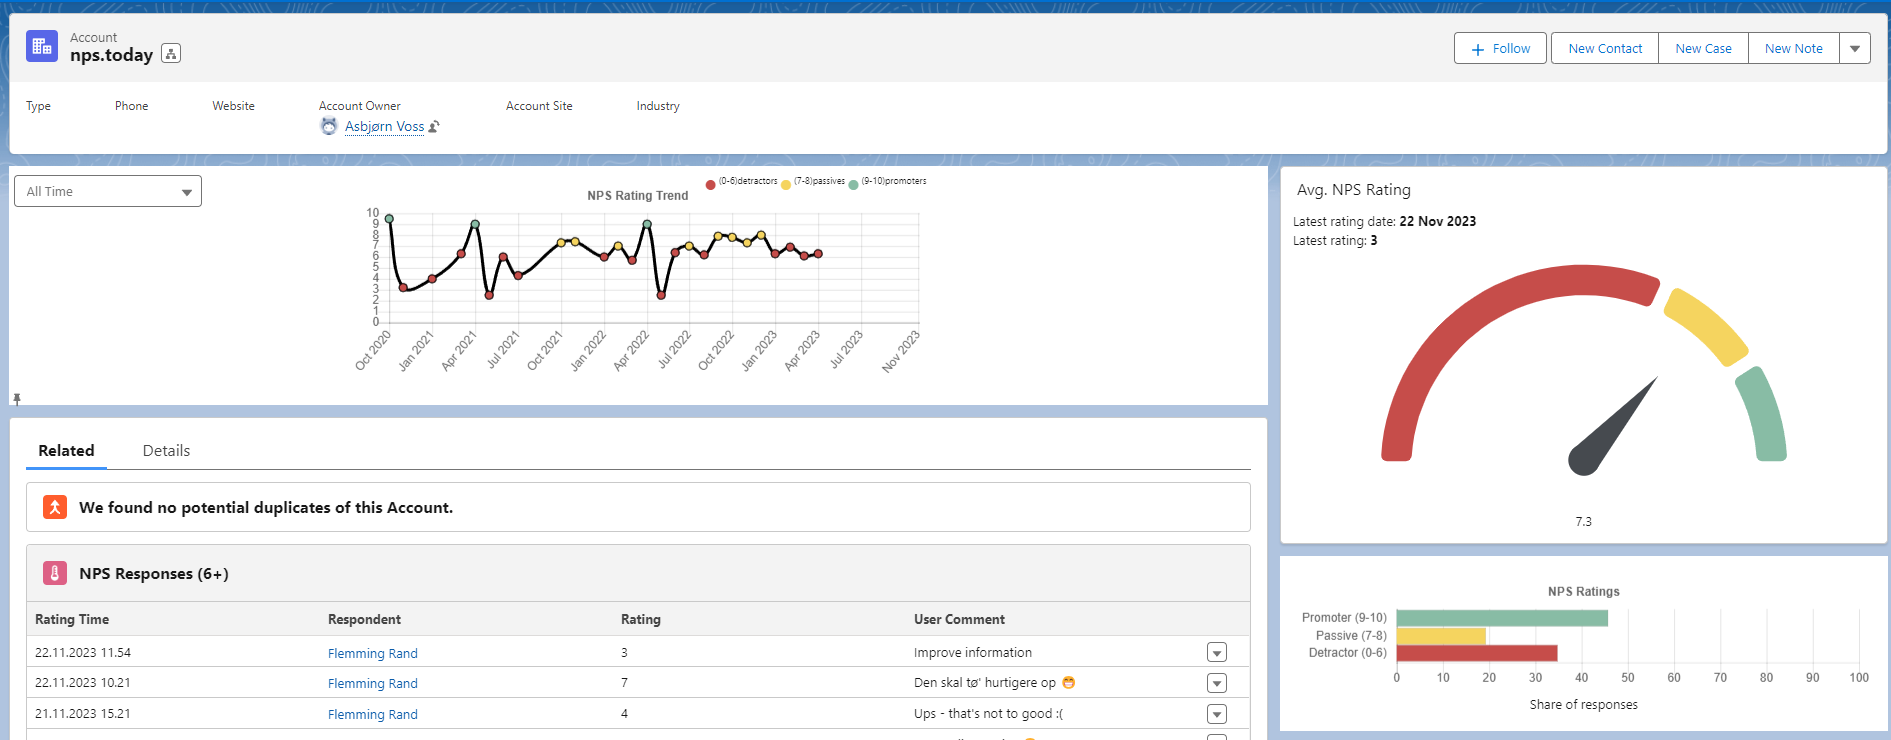
Press save -> Activate -> Assign as Org Default to add it to all accounts.
Do the same steps on Contacts by going to a random contact and press the cog wheel in the top right corner and click Edit page and drag the Custom – Managed components into the page wherever you like.
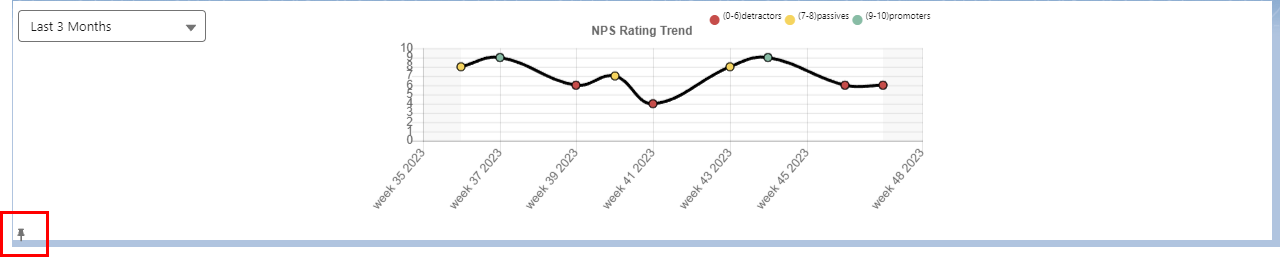
The advantage of the new graphs mostly is due to an improved version of NPS Rating Trend. The new graph makes it possible to choose different timelines such as “all time”, “last 6 months”, “last 3 months”, “last month”, and “last week”. It is also possible to pin the timeline on an account or contact page. In the future, these will become our default NPS graphs in Salesforce. You can pin the setting to your Page View:
Show NPS response details on Contact/Person Account detail page
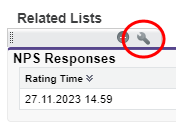
To show details about NPS responses related to a contact, simply add the “NPS Responses” related list to the relevant Contact/Person page layout.
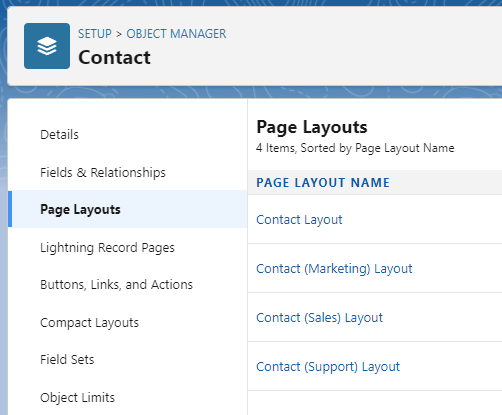
Go to Setup -> Object and Fields -> Object Manager. Select the right Label - Contact.
Now click Page Layout and select the right Page Layout.
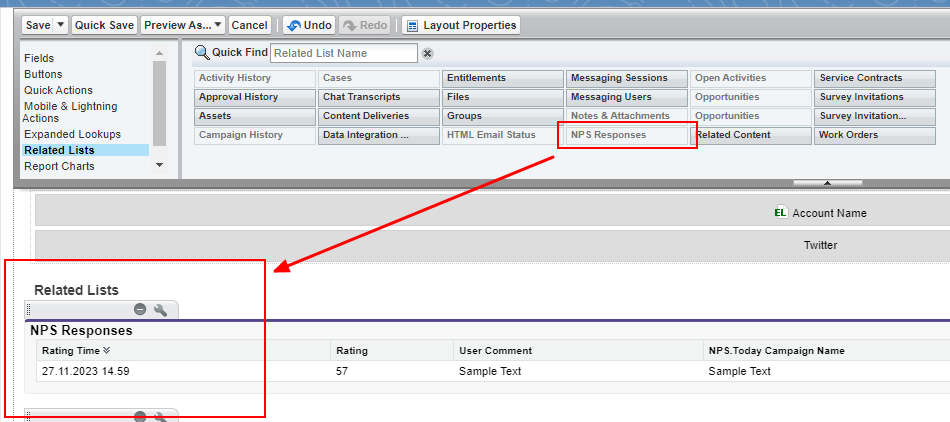
Now select Related Lists and drag the NPS Responses label down where you want it to be.
Press here the to add properties.
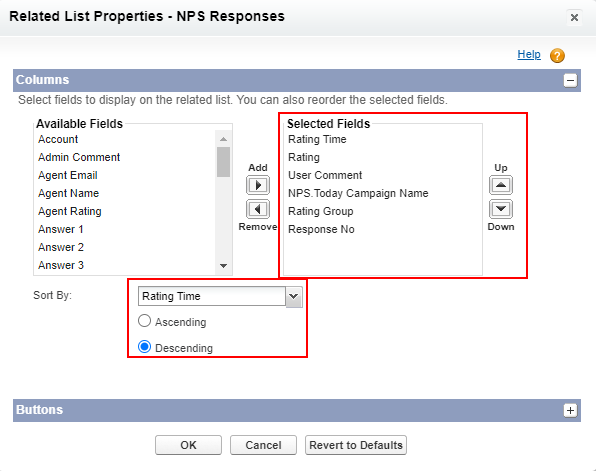
The following columns are recommended as a good default starting point. Put the selected field in the order you want.
Sort by Rating Time as Descending.
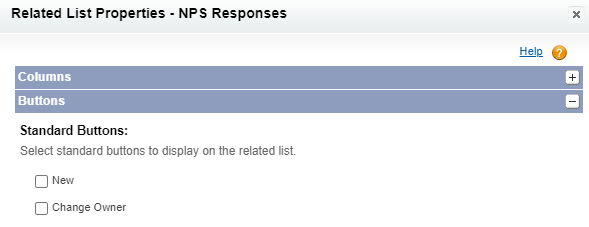
In the Standard Buttons section uncheck the boxes
Press OK and Save the Contact Layout.
Create button to manually request NPS rating from contact
Here we will show how to add a button on Contacts, that allows Salesforce Users to request an NPS rating (i.e. add a contact to an nps.today campaign). To do this you need to create a new Contact Quick Action to invoke a flow.
Navigate to Setup -> Object Manager -> Contacts.
Now go to Buttons, Links, and Actions and Create a New Action.

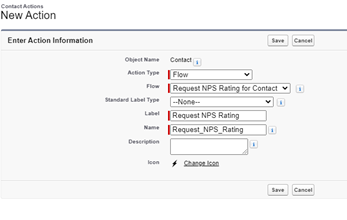
Setup the button as you like. E.g.:
| Field | Value |
|---|---|
| Action Type | Flow |
| Flow | Request NPS Rating for Contact |
| Standard Label Type | --None-- |
| Label | Name accordingly etc. Request NPS Rating |
| Name | Name accordingly etc. Request NPS Rating |
It could look like this:
To add the quick action to relevant contact navigated to your Contact Layout: Setup -> Object Manager -> Contacts -> Page Layouts -> Contact Layout.
In the Mobile & Lightning Actions section drag your button to the Salesforce Mobile and Lightning Experience Actions and click Save.
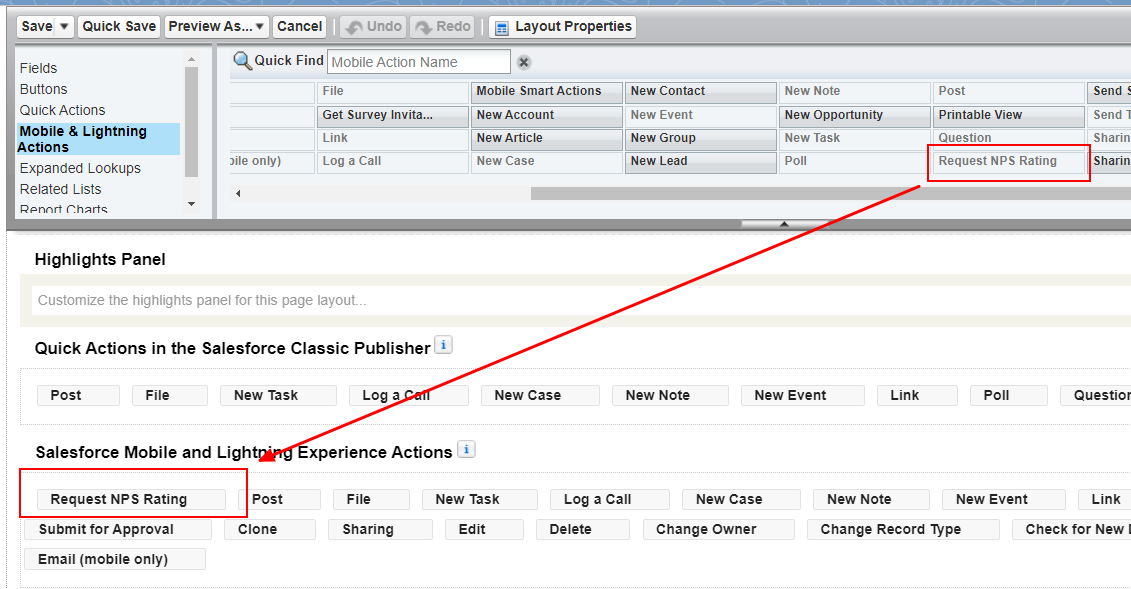
Now go to a Contact to see if you see the button.

Create NPS automations in Process Builder
To be performed by Salesforce Admin with some Salesforce experience. Below example is made in the Process Builder, but similar automations can be made in Flows
From a process builder, flow or other context, invoke the “Request NPS Rating for Contact” or “Request NPS Rating for Contacts” headless flow/invokable method.
Go to Process Automation -> Process Builder -> New in the top right corner. You can now build the processes that gives your company value.
An example is like this – Send a NPS when Case is closed as won:
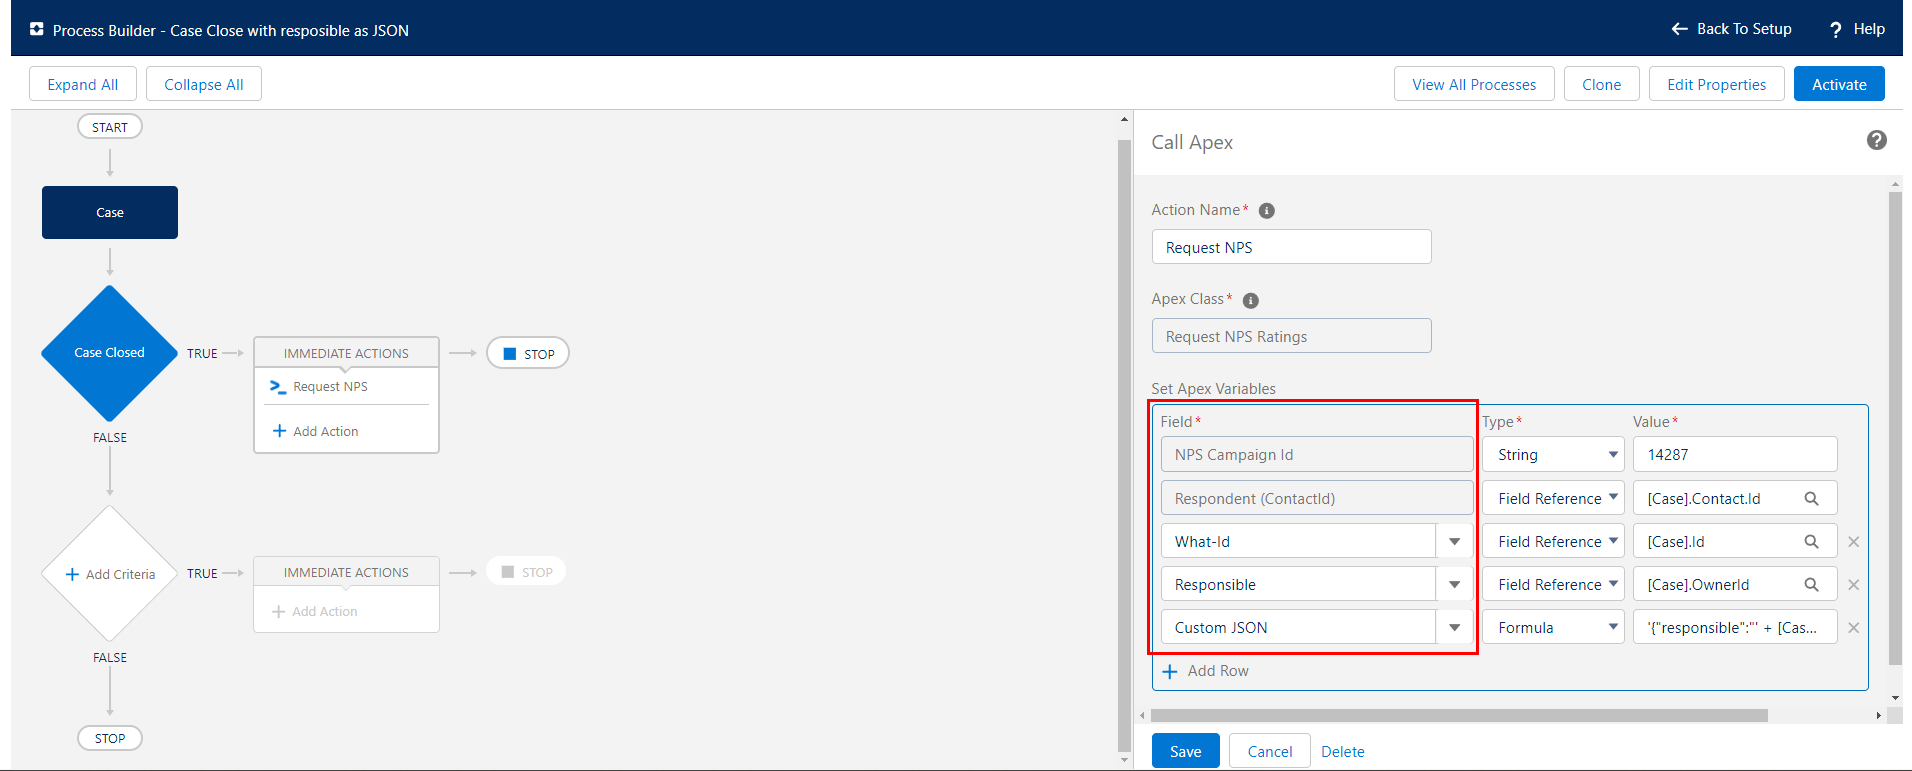
Above you see how you need to use the “Request NPS Rating” Apex Class to request an NPS. Below is an explanation on what the different Apex Variables is.
| Apex Variable | Description |
|---|---|
| NPS Campaign Id | The ID of the campaign you need to find in nps.today. |
| Respondent | The Respondent, that need to receive the NPS survey |
| What-Id | The ID of the record you need to refer to. In above example it is the Case Id because we are sending out an NPS after a case is closed |
| Responsible | The Responsible of the customer receiving the NPS Survey. In above case it is the responsible of the case, the Case Owner. In other situations, in could be the contact owner or the owner of the Account the Contact is related to. |
| Custom JSON | Here you can use JSON coding to ad any kind of Salesforce data in the nps.today custom field. This field accepts any valid json. We do not perform any actions on this information other than storing it and returning it to you on request. Limited to 8kb or nvarchar(4000) |
One last thing to remember
As a default in nps.today you can’t send surveys to the same contact more than once on a campaign. Therefore, if you want to send multiple surveys to the same contact from a campaign, you must Allow duplicates in the campaign setting on the specific campaign.
Operation
It is recommended to monitor the following:
• Apex jobs execute with success (see the “nps.today Admin“ tab or the standard “Apex Jobs” data through the “Apex Jobs” setup page or other means).
• Records in the npstoday__Error__c. For issue free operation, no records are expected to be generated.
Appendix
Useful tips and tricks to automate your NPS-requests
To be performed by Salesforce Admin with some Salesforce experience. Here are some examples made in the Process Builder, but similar automations can be made in Flows.
Go to Process Automation -> Process Builder -> New in the top right corner. You can now build the processes that gives your company value.
This example create the automation - Send a NPS when Opportunity is closed as “WON”, if you have customers from several countries:
First you need to choose the right campaign in nps.today, that needs to trigger the survey. This could be a "String" with a campaign ID og a “Formula" to choose the right nps.today campaign ID according to for example the Contact’s mailing country (if it is a Danish, English or German campaign). With the CASE-function you can just clone the process and insert a new country name and its nps.today campaign ID, whenever you create campaigns for more countries in the future.
Other useful automations
• After a meeting with new business customer. NPS is often used in sales to give the salesperson insight, how the meeting went. • After sending a quote to the new customer to give insights if there are any obstacles before making the deal. • NPS xx days before a current agreement expires. It gives an opportunity to make a recovery on detractors, so they are more likely to re-sign a deal. Very good for subscriptions. After the delivery of a product or a service.