Jira Integration Guide
Introduction
This guide sets up a closed-loop transactional (tNPS) survey between Jira and nps.today.
When a work item is completed in Jira, nps.today automatically sends a survey to the person who reported it. When they answer, feedback data like rating and comment are written straight back onto the Jira work item — so the feedback lives next to the ticket it relates to, ready for follow-up and reporting.
You will set up three things, in order:
- The trigger — a Jira global automation rule that calls nps.today when a work item is completed.
- Jira's response fields — two custom fields (Rating and Comment) plus an API token, so nps.today's answer has somewhere to land.
- The closed loop — a Power Automate flow, or other middleware solution, that receives the survey response and writes it back to the work item via the Jira REST API.
Note
The webhook step uses middleware (Power Automate) because the closed-loop write needs Jira's own REST API. Power Automate receives the nps.today response, then calls Jira to update the work item. Azure Logic Apps or Zapier would work the same way.
Prerequisites
Before you start, make sure all of the following are true:
- An nps.today subscription with permission to create campaigns and API keys.
- A Jira Cloud site with administrator access (global automation and custom fields are admin features).
- A Power Automate plan that allows the HTTP action and the "When a HTTP request is received" trigger (a premium connector).
- The Jira account you will use for the write-back must be able to see and edit the work items in the target project.
- You have decided which Jira project the surveys relate to (this guide uses the example project key
KAN).
Part 1 — Trigger a survey when a work item is completed
Data flows Jira → nps.today. A global automation rule fires when a work item transitions to Done and sends a respondent to your nps.today campaign, carrying the Jira issue key so the response can be matched back later.
Step 1: Create the campaign in nps.today
- In nps.today, create the campaign that will send your tNPS survey.
- Note its campaignID — you'll need it for the request URL. (How to find your campaignID.)
This guide uses campaignID 16588 in its examples.
Step 2: Create an nps.today API key
Create an API key for this integration (how to create one).
Use one dedicated key per integration. You'll put it in the Authorization header of the Jira request.
Step 3: Build the global automation rule in Jira
Go to Jira admin settings → System → Global automation and create a new rule.
3a. Add the trigger
Trigger: Work item transitioned To status: Done
3b. Add the "Send web request" action
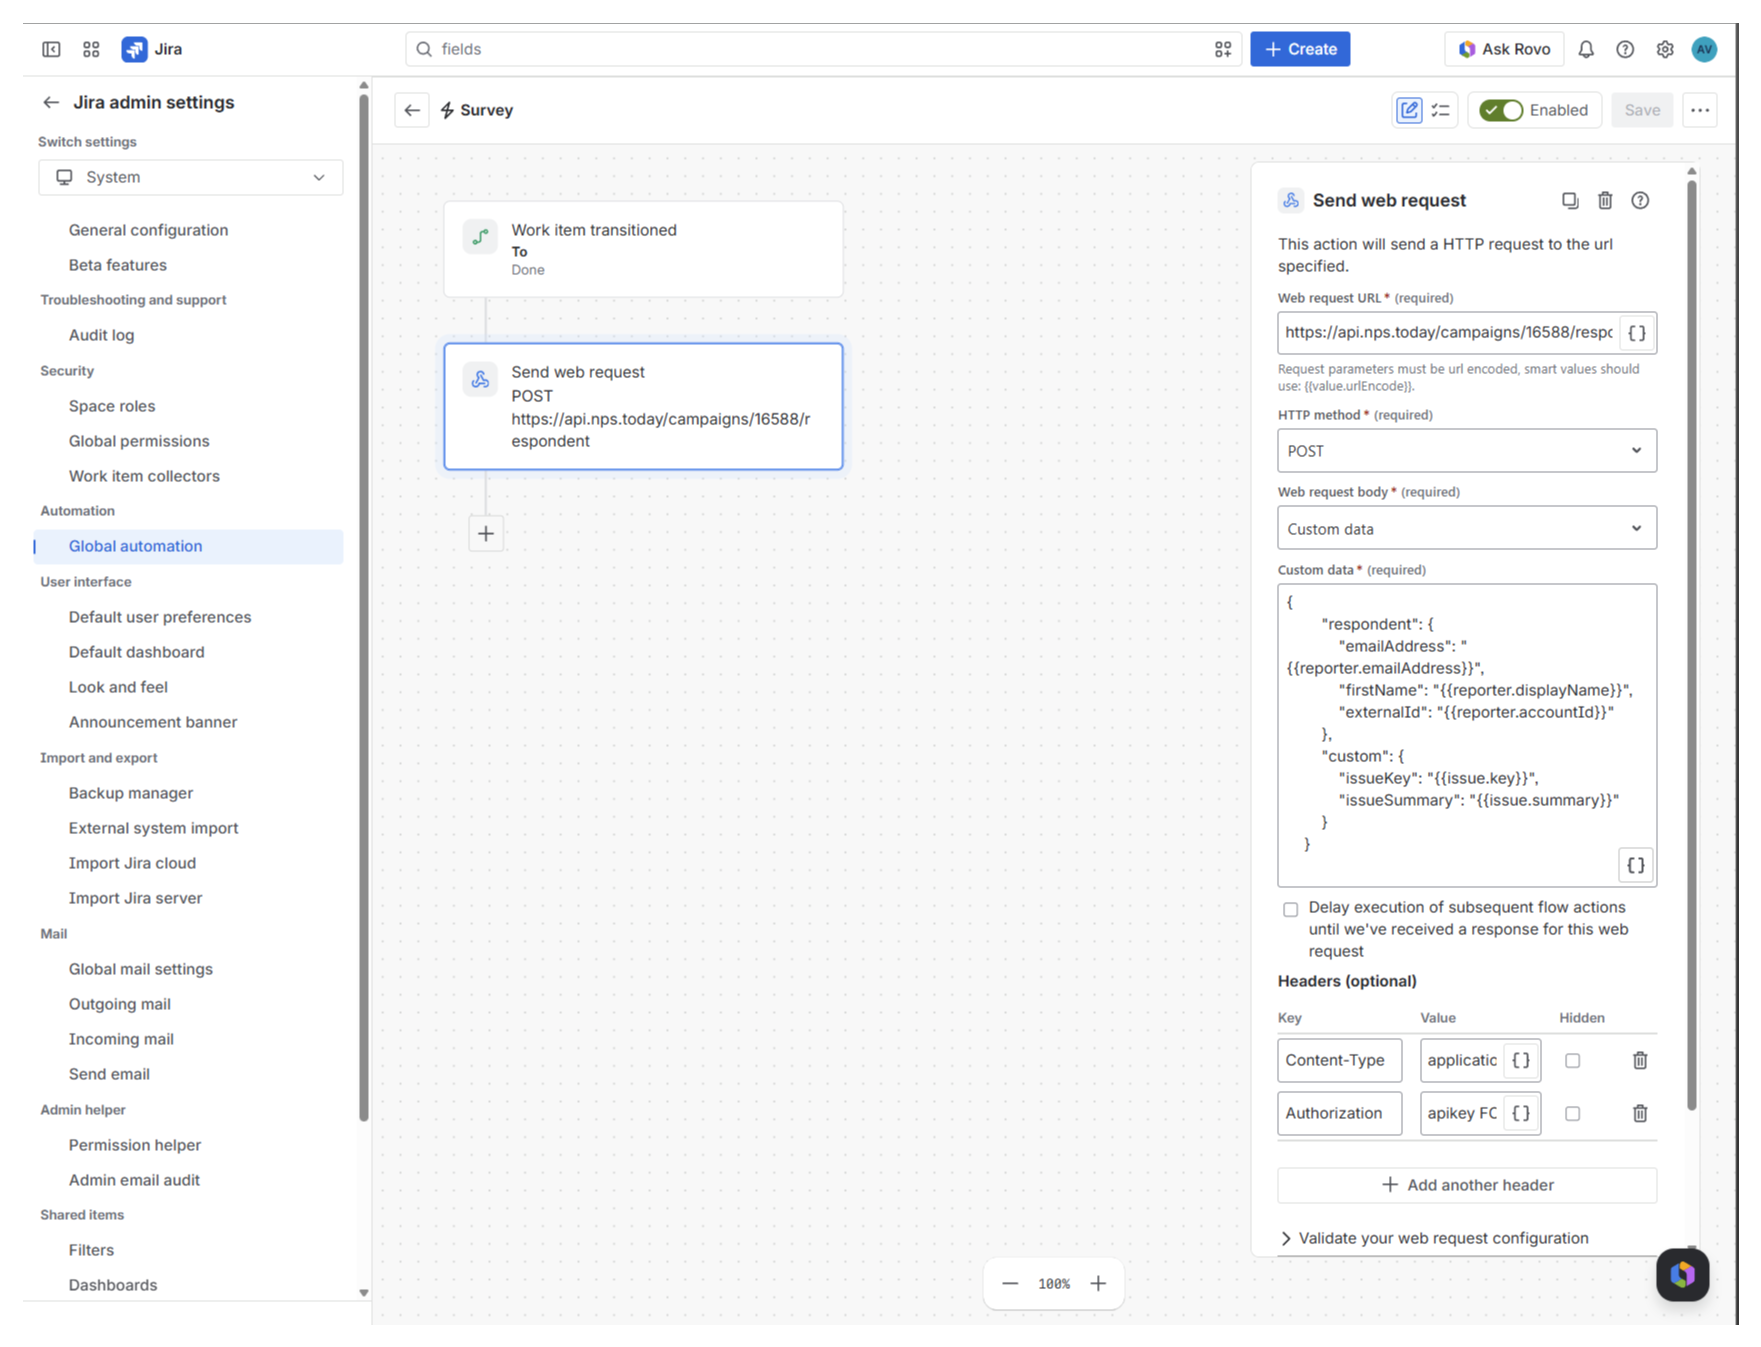
Add a Send web request action with:
Web request URL:
https://api.nps.today/campaigns/16588/respondent
(API reference: POST /campaigns/{campaignId}/respondent. Replace 16588 with your own campaignID.)
HTTP method: POST Web request body: Custom data
Headers:
| Key | Value |
|---|---|
Content-Type |
application/json |
Authorization |
apikey <your nps.today API key> |
3c. Set the request body (Custom data)
Paste below example into Custom data. The smart values in {{ }} are filled in by Jira at runtime. Remember you can edit the body yourself to map all the fields you need from Jira.
{
  "respondent": {
    "emailAddress": "{{reporter.emailAddress}}",
    "firstName": "{{reporter.displayName}}",
    "externalId": "{{reporter.accountId}}"
  },
  "custom": {
    "issueKey": "{{issue.key}}",
    "issueSummary": "{{issue.summary}}"
  }
}
{{issue.key}} is the key that closes the loop. You carry the Jira issue key (e.g. KAN-2) into nps.today as a custom value, and it comes back unchanged in the survey response so Power Automate knows which work item to update.
Field mapping into the nps.today campaign member:
reporter.emailAddress -> respondent.EmailAddress reporter.displayName -> respondent.FirstName reporter.accountId -> respondent.ExternalId issue.key -> Custom.issueKey issue.summary -> Custom.issueSummary
Tip
You can carry the numeric issue ID ({{issue.id}}) instead of the key if you prefer — both work
in the Jira update URL later. The key (e.g. KAN-2) is more human-readable, so this guide uses it.
Save and enable the rule.
Step 4: Test the trigger
- Move a test work item to Done.
- Open the rule's Audit log in Jira and confirm the Send web request action returned success.
- In nps.today, confirm a new respondent/campaign member appears on the campaign, and that the survey is sent.
Part 2 — Prepare Jira to receive the response
Before the loop can close, Jira needs two custom fields to hold the answer, and you need an API token so Power Automate can authenticate.
Step 1: Create the Rating and Comment custom fields
Go to Jira admin settings → Fields → Create new field and create two fields:
NPS Rating Field type: Number
NPS Comment Field type: Short text (single line)
Why Short text for the comment
A Short text field accepts a plain string, which keeps the write-back simple. A Paragraph field stores rich text and requires Atlassian Document Format (ADF) instead of a plain string — see the advanced note in Part 3. Use Short text unless you specifically need long, formatted comments.
Step 2: Add the fields to your work type's screens
Make sure both fields are added to the screens used by the work type you're surveying.
This step is easy to miss
If a custom field isn't on the work item's edit screen / field configuration, the API write fails with "Field cannot be set. It is not on the appropriate screen, or unknown." If your rating or comment won't save later, check this first.
Step 3: Find the custom field IDs
The REST API references fields as customfield_NNNNN, not by name. To find your two IDs, call:
GET https://YOURSITE.atlassian.net/rest/api/3/field
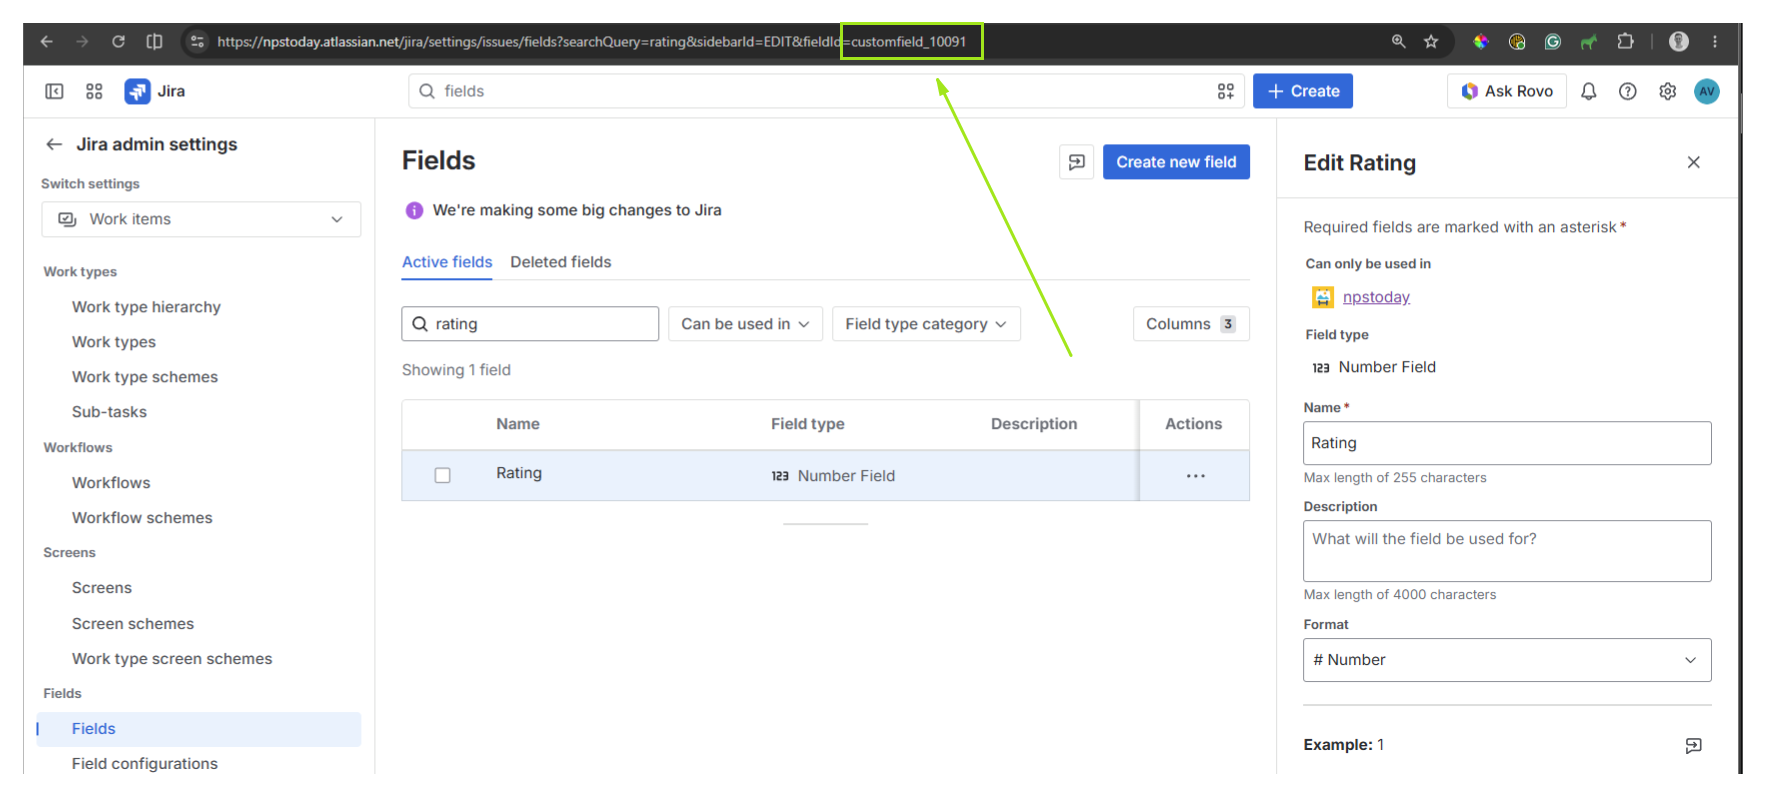
Find your fields by name in the response and note each id. This guide uses:
| Field | Example ID | Type |
|---|---|---|
| NPS Rating | customfield_10091 |
Number |
| NPS Comment | customfield_10092 |
Short text |
Note
Custom field IDs are unique to your Jira site — yours will differ. Always look up your own.
Step 4: Create a Jira API token
The write-back authenticates as a real Jira user using Basic authentication (email + API token).
- Sign in as the account that can edit the target work items.
- Go to id.atlassian.com/manage-profile/security/api-tokens.
- Click Create API token (the plain one — not "Create API token with scopes").
- Give it a label, set an expiry, click Create, and copy the token now — you can't view it again.
Use the classic token, not the scoped one
Scoped tokens use a different gateway (api.atlassian.com/ex/jira/{cloudId}) and Bearer auth. This
integration talks to YOURSITE.atlassian.net with Basic auth, which needs the classic
(unscoped) token, used as the password alongside your email.
Part 3 — Write the rating and comment back (closed loop)
Data flows nps.today → Power Automate → Jira. When a survey is answered, nps.today's NPS Notification webhook posts the response to a Power Automate flow, which updates the Jira work item.
Step 1: Create the Power Automate flow with an HTTP trigger
- Create a new Automated cloud flow.
- Choose the trigger When a HTTP request is received.
- Save the flow once. Power Automate generates the trigger's HTTP POST URL — copy it; you'll paste it into nps.today in Step 4.
Step 2: Add the response schema to the trigger
On the trigger, set the Request Body JSON Schema so the response fields are available as tokens. You only need the fields you'll use:
{
  "type": "object",
  "properties": {
    "Rating": { "type": "integer" },
    "UserComment": { "type": ["string", "null"] },
    "Custom": {
      "type": "object",
      "properties": {
        "issueKey": { "type": "string" },
        "issueSummary": { "type": "string" }
      }
    }
  }
}
Note
Rating and UserComment sit at the top level of the nps.today payload — not inside
Custom. The issue key you carried in Part 1 comes back under Custom.issueKey. The schema above
reflects that. Power Automate ignores any other fields in the payload, so there's no need to map
the whole thing.
Advanced: the full NPS Notification payload
The webhook sends a large object (respondent, company, employee, category, timestamps, and more).
The fields this integration uses are Rating, UserComment, and Custom. A trimmed example:
{
  "Rating": 7,
  "UserComment": "Quick and helpful, thanks",
  "Custom": { "issueKey": "KAN-2", "issueSummary": "Lets get this to work" },
  "CampaignId": 16588,
  "Closed": true
}
Use the Test button on the nps.today webhook (Step 4) to see the exact payload for your campaign.
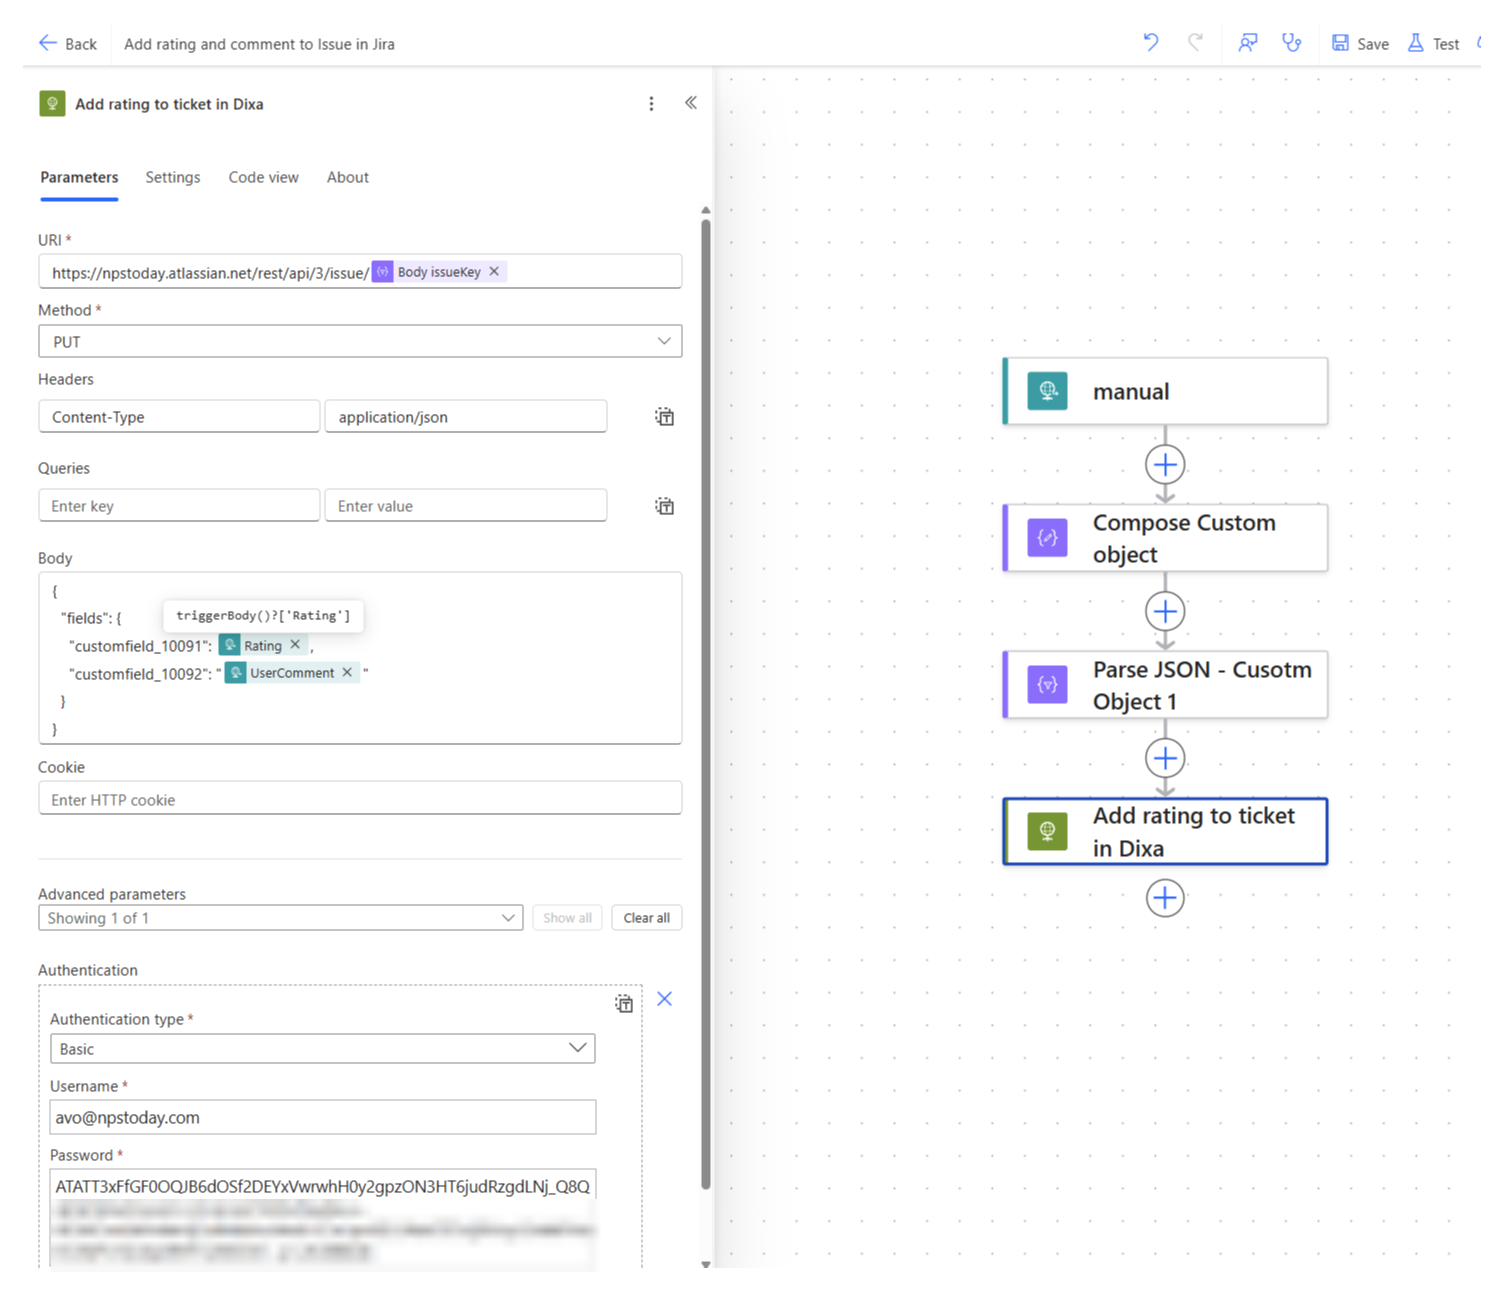
Step 3: Add the Jira update action (HTTP PUT)
Add an HTTP action. Updating an existing work item's fields is a PUT (not a POST). See more about the endpoint used here.
Method: PUT URL:
https://YOURSITE.atlassian.net/rest/api/3/issue/@{triggerBody()?['Custom']?['issueKey']}
(API reference: PUT /rest/api/3/issue/{issueIdOrKey}. The endpoint accepts the issue key or numeric ID.)
Headers:
| Key | Value |
|---|---|
Content-Type |
application/json |
Body:
{
  "fields": {
    "customfield_10091": @{triggerBody()?['Rating']},
    "customfield_10092": "@{triggerBody()?['UserComment']}"
  }
}
Rating — a Number field, so the value is unquoted (a number, not a string). Map it to the top-level Rating token.
Comment — a Short text field, so the value is a quoted string. Map it to UserComment.
Authentication: Basic Username: your Atlassian account email Password: the API token from Part 2, Step 4
Let Power Automate build the auth header
Use the action's Authentication → Basic fields rather than writing the Authorization header
by hand. Power Automate base64-encodes email:token for you. If you also set a manual
Authorization header, remove it so the two don't conflict.
A successful update returns 204 No Content (an empty body) — that's success, not an error.
Advanced: writing to a Paragraph (rich-text) comment field
If you chose a Paragraph field for the comment instead of Short text, a plain string won't work — it must be Atlassian Document Format (ADF):
"customfield_10092": {
  "type": "doc",
  "version": 1,
  "content": [
    { "type": "paragraph",
      "content": [ { "type": "text", "text": "@{triggerBody()?['UserComment']}" } ] }
  ]
}
Step 4: Connect the NPS Notification webhook in nps.today
Now tell nps.today to call your Power Automate flow when a response arrives.
- In nps.today, go to Campaigns → NPS Notifications → Add NPS Notification and create a notification using the Webhook channel.
- Set the webhook URL to the HTTP POST URL you copied from Power Automate in Step 1.
- Attach the notification to your campaign: Campaign editor → Settings → NPS Notification triggers.
- Set the NPS Criteria to the full 0–10 range so every response triggers the write-back.
(Full reference: How to use NPS Notifications.)
Check your NPS Criteria
By default a notification may only fire for a subset of ratings (e.g. detractors). If you want every response written back to Jira, the criteria must cover 0–10.
Step 5: Test the closed loop
- Use the Test button on the nps.today webhook to send a sample payload, and confirm your Power Automate flow runs.
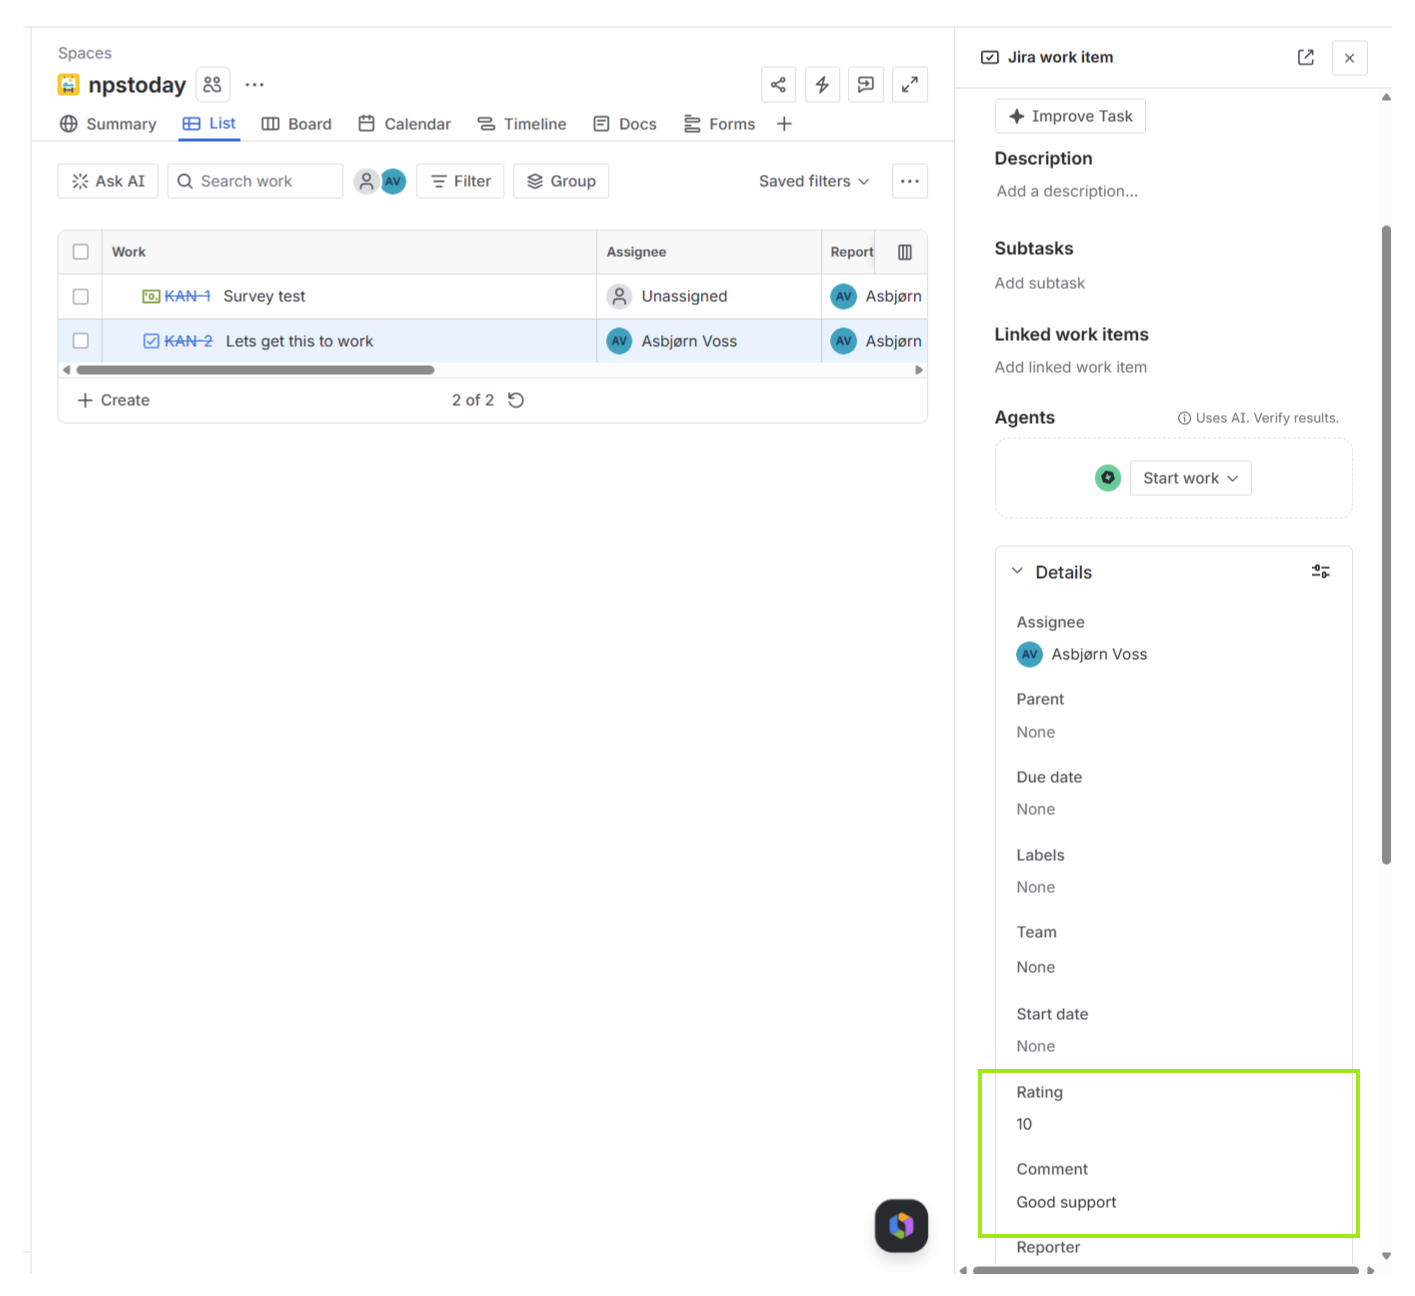
- Or run it end to end: complete a work item, answer the survey, then open the work item in Jira.
- Confirm the NPS Rating and NPS Comment fields are populated.
Troubleshooting
404 — \"Issue does not exist or you do not have permission to see it.\"
The request is reaching Jira as an unauthenticated user, so it can't see a private issue. A
tell-tale sign is an atlassian.xsrf.token cookie in the response — Jira sets that for anonymous
requests. Fix the authentication:
- Use Basic auth with your Atlassian email as the username and the classic API token as the password — not the token alone, and not
Bearer. - Make sure the token belongs to an account that can see and edit the work item.
- Quick test: change the method to GET on the same URL. If GET returns the issue, auth is good; switch back to PUT.
400 — \"Field cannot be set. It is not on the appropriate screen, or unknown.\"
The custom field isn't on the work type's screen / field configuration. Add it (Part 2, Step 2).
The comment saves but the rating stays empty
The rating value isn't reaching Jira. Two common causes:
- Wrong source binding. The Rating token must point at the top-level
Ratingin the payload, not a sub-object (like a parsedCustom) that has no rating. Re-pick it from the same source as the working comment token, or use the expressiontriggerBody()?['Rating']. - Quoted value into a Number field. Send the rating unquoted (
7, not"7").
Power Automate: \"template was invalid… action '' is not defined\"
A flow action is referenced by an empty name — usually a leftover token from a renamed or
deleted action. Open Code view and search for ('') (e.g. body(''), outputs('')) or an
empty runAfter key, and re-pick the affected token.
Power Automate: Parse JSON fails — \"Required property 'content' expects a value but got null\"
A Parse JSON action has an empty Content field. Either give it the value to parse, or delete the action if it's redundant.
Keep your certificate trust current
Connections use TLS 1.2 or 1.3. Don't pin the api.nps.today certificate — it renews about every
six months; trust the DigiCert Global Root G2 CA chain instead (Java truststores are the usual
culprit). See API Certificate & TLS.
Congratulations
You've set up a full closed-loop Jira integration: surveys fire automatically when work is completed, and every rating and comment lands back on the work item it relates to.
Questions or something not behaving as expected? Contact nps.today support.