Map custom data to a campaign member
The Request NPS Ratings action in Salesforce sends more than just the respondent. With the Custom JSON input you can attach any Salesforce data you like to the survey request, and it is stored as custom data on the campaign member in nps.today. From there you can filter on it, export it, and report on it in e.g. your Power dashboard.
A typical use is sending business context that only lives in Salesforce, for example account ownership, renewal date, segment, region, product, or contract value, so that feedback can be analysed by those dimensions.
Prerequisites
- The nps.today Salesforce plug-in installed and connected. See Installing your Salesforce Plug-in.
- A campaign in nps.today and its Campaign Id.
- A Salesforce Flow that already triggers surveys through the Request NPS Ratings action.
- The API names of the Salesforce fields you want to send, and their field types.
Note
Custom data is written when the campaign member is created, so it reflects the values on the record at the moment the survey is requested. It is a snapshot, not a live lookup.
How it works
The Custom JSON input expects a text value containing a JSON object: a flat set of key and value pairs. Each key becomes a custom data field on the campaign member, and each value is the data from Salesforce.
You build that text with a formula resource in the Flow, because a formula lets you mix fixed JSON syntax with live field values from the record.
This is the same custom object used when triggering a survey directly through the API, so the
result is identical no matter which route the data takes. See
Trigger a survey with nps.today
and POST /campaigns/{campaignId}/respondent.
{
  "accountOwnership": "Public",
  "renewalDate": "2027-03-31"
}
Step 1: Decide which fields to send
Write down the fields you need and the key name each one should get in nps.today.
| Salesforce field | Field type | Key in nps.today |
|---|---|---|
Account.Ownership |
Picklist | accountOwnership |
Account.Renewal_date__c |
Date | renewalDate |
Tip
Keep key names short, stable and in the same style every time, for example camelCase. Each key
becomes its own column in exports and e.g. in your Power dashboard, so renaming a key later creates a
second column instead of updating the first one.
Only send data you actually need for analysis. Custom data is stored on the campaign member in nps.today, so avoid sensitive personal data that has no reporting purpose.
Step 2: Create the formula in your Flow
- Open your Flow in Flow Builder.
- In the Toolbox, click New Resource.
-
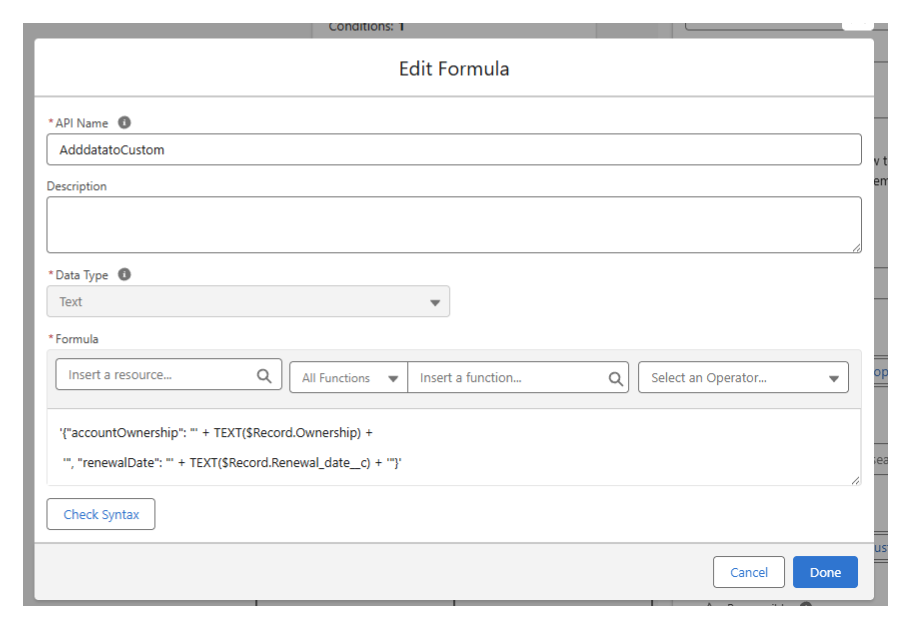
Fill in the resource:
Resource Type: Formula API Name:
AdddatatoCustom(or another descriptive name) Data Type: Text -
Enter the formula that builds the JSON. The example below sends account ownership and renewal date:
'{"accountOwnership": "' + TEXT($Record.Ownership) + '", "renewalDate": "' + TEXT($Record.Renewal_date__c) + '"}' -
Click Check Syntax, then Done.
Reading the formula
The formula is plain text glued together with +. The single quotes mark the literal text, and the
double quotes inside them are the JSON syntax that nps.today needs. The version below is split into
one piece per line with explanations, so use the formula in step 4 above for copying.
'{"accountOwnership": "'          // (1)!
+ TEXT($Record.Ownership)         // (2)!
+ '", "renewalDate": "'           // (3)!
+ TEXT($Record.Renewal_date__c)   // (4)!
+ '"}'                            // (5)!
- Opens the JSON object and the first key, ending with the opening quote of its value.
- The value itself, converted to text.
- Closes the first value and opens the next key. This is the piece you repeat for every extra field.
- The second value.
- Closes the last value and the JSON object.
To add a third field, insert one more pair of '", "yourKey": "' + TEXT(...) before the closing
'"}'.
Converting field types
TEXT() is needed for values that are not already text.
| Salesforce field type | In the formula |
|---|---|
| Text, Text Area, Email, Phone | $Record.Field__c |
| Picklist | TEXT($Record.Field__c) |
| Date, Date/Time | TEXT($Record.Field__c) |
| Number, Currency, Percent | TEXT($Record.Field__c) |
| Checkbox | IF($Record.Field__c, 'true', 'false') |
Warning
TEXT() on a picklist returns the API name of the selected value, not the label. If the
label and the API name differ, that is what you will see in nps.today.
Advanced: blank values, quotes and long text
Blank values. A blank field simply produces an empty string, which is valid JSON. If you would rather send a placeholder, wrap the value:
BLANKVALUE(TEXT($Record.Renewal_date__c), 'unknown')
Double quotes in the value. A double quote inside a value breaks the JSON. Strip it out before it reaches the payload:
SUBSTITUTE($Record.Company_name__c, '"', '')
Line breaks. Long text fields can contain line breaks, which are not valid inside a JSON string. Replace them with a space:
SUBSTITUTE($Record.Notes__c, BR(), ' ')
Fields from another record. $Record is always the record that triggered the Flow. To send a
value from a record you fetched or from the current item in a loop, insert that resource with the
Insert a resource picker in the formula editor instead of $Record.
Size. The Custom JSON value is limited to 8 kb. A single Flow formula also has a length limit, so for very large payloads build the text in a Text Template or in Apex instead of one formula.
Step 3: Assign the formula to Custom JSON
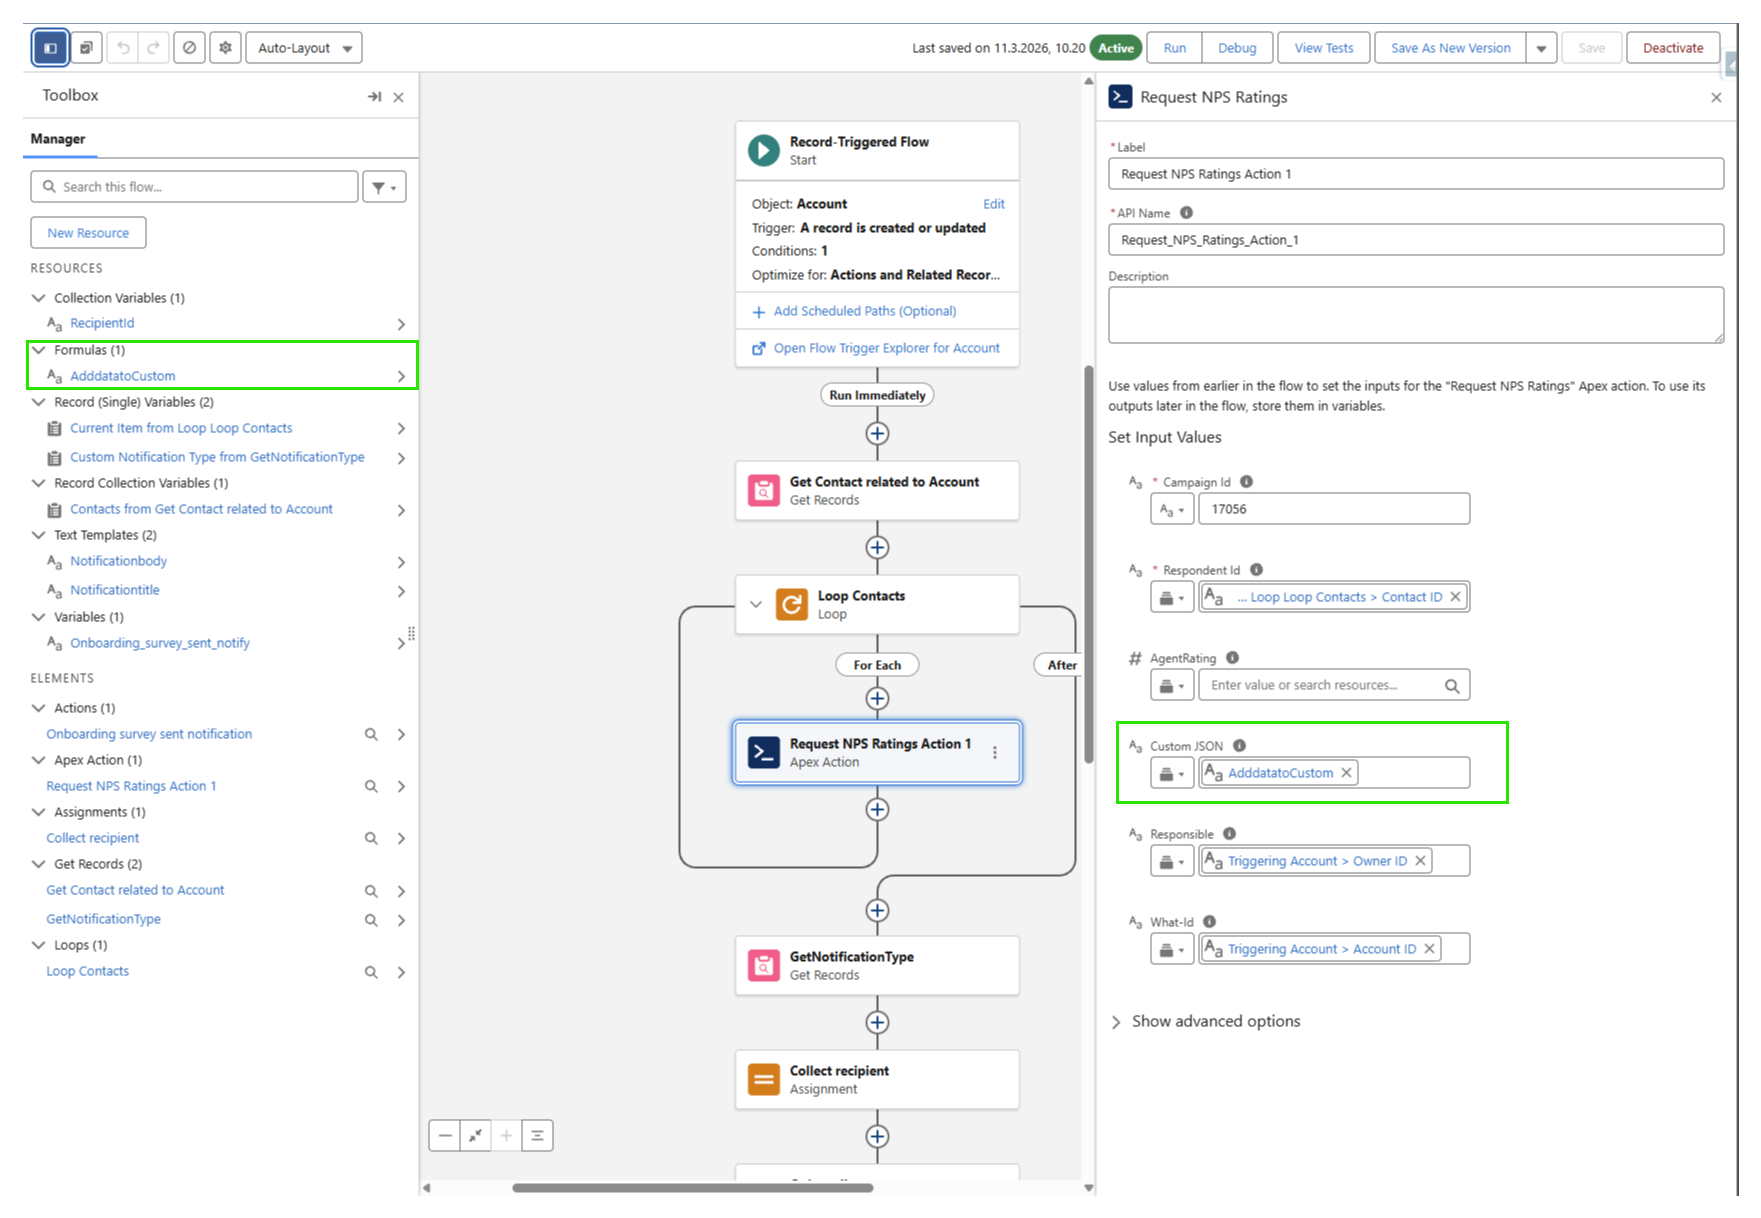
- On the canvas, click the Request NPS Ratings action.
- Find the Custom JSON input.
- Select your formula resource, for example
AdddatatoCustom. - Click Save As New Version, then Activate.
Warning
The change only takes effect once the new version is activated. An older active version keeps running without the custom data.
Step 4: Test and verify
- In Flow Builder, click Debug and run the Flow against a record that has values in the fields you mapped, or update a real record so the trigger conditions are met.
- Confirm the action completed without an error in the debug details.
-
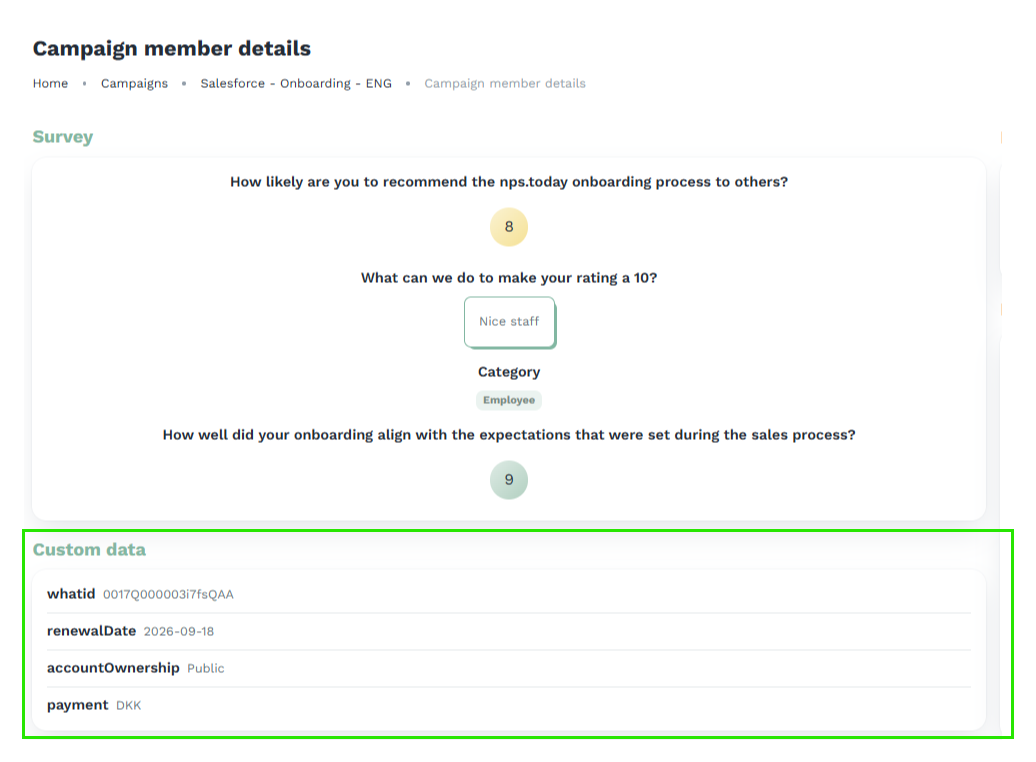
In nps.today, open the campaign and find the new campaign member. The mapped keys and values are shown as custom data on the member.
-
To verify through the API, call
GET /v2/bi/campaignmembersand check thecustomobject on the campaign member:{ "custom": { "accountOwnership": "Public", "renewalDate": "2027-03-31" } }
Use the data in your Power dashboard
Custom data arrives in Power BI in the Campaignmembers query, in the Campaignmembers.custom column. Expand that column to get one field per key. The full steps are in How to add your custom data to your Power dashboard.
Tip
When you add a new key to the formula later, expand Campaignmembers.custom again in Power BI so the new field appears.
Troubleshooting
| Symptom | What to check |
|---|---|
| No custom data on the campaign member | The formula is actually selected in the Custom JSON input, and the Flow version with the change is the active one. |
| The formula will not save | Click Check Syntax. The usual cause is a missing +, an unbalanced quote, or TEXT() used on a field that is already text. |
| A value is empty | The field is blank on the triggering record, or the formula points at $Record when the value lives on another record. |
| A picklist value looks wrong | TEXT() returns the API name of the value, not the label. |
| Custom data looks broken or truncated | The value contained a double quote or a line break, or the payload exceeded 8 kb. See the advanced notes above. |
| New keys missing in Power BI | Expand Campaignmembers.custom again in Power BI desktop and click Close & Apply. |
Still stuck? Contact us at [email protected] and include the Flow name, the campaign id, and the campaign member you tested with.
Congratulations
Your Salesforce data now travels with every survey request and is available for filtering, export and reporting in nps.today.